In the last few years theres been a big push for Docker Desktop on developer workstations, many of those workstations being Mac and Windows not Linux. But since containers need a Linux kernel to run how does Docker Desktop handle this? Unfortunately the documentation out there is very light particularly using WSL2 so i have taken the time to do research and document my findings.
WSL2 Deep Dive
Windows History
Before we talk about WSL it’s important to understand a bit about Windows, specifically Windows NT(kernel) and its subsystems. Since the beginning, Windows was designed with the ability to use several different subsystems such as POSIX, OS/2, and Win32 which is the most commonly used one today. This would give a programmatic interface to the applications without having to worry about how to implement them in the WindowsNT kernel itself.
Each subsystem was implemented as “user mode” modules that issued appropriate NT system calls based on the API they presented to the applications for that subsystem. All applications were PE/COFF executables, a set of libraries and services to implement the subsystem API, and NTDLL to perform the NT system call. This means when a user launched a program it would indicate which subsystem to use and load all of its dependencies along with it based on the executable header. The predecessor to WSL, Subsystem for Unix-based Applications (SUA) was a replacement for POSIX, it was created to encourage developers to port their applications over by not having to worry about major rewrites to their code, instead, they implemented the POSIX user-mode APIs using NT constructs. However because the components were constructed in user mode, this model relied on the need for programs to be recompiled and required ongoing feature porting and was a maintenance burden.
Eventually, most of those initial subsystems were retired but the Windows NT kernel maintained the ability to support multiple subsystems.
WSL1
WSL1 makes use of this ability by deploying a Linux Kernel Emulator Subsystem alongside the Win32 Subsystem. It is a collection of user-mode and kernel-mode components that give the ability to run native Linux ELF64 binaries to run on Windows. The main components are the LXSS Manager service which is a user-mode session manager service that handles the Linux instance life cycle. The Pico Processes that host the unmodified user mode Linux (e.g. /bin/bash). The Pico Provider Drivers (lxss.sys, lxcore.sys) emulates the Linux kernel by translating Linux system calls into WindowsNT system calls such as fork(). Again this was an emulated Linux kernel and not an actual Linux Kernel as shown below.
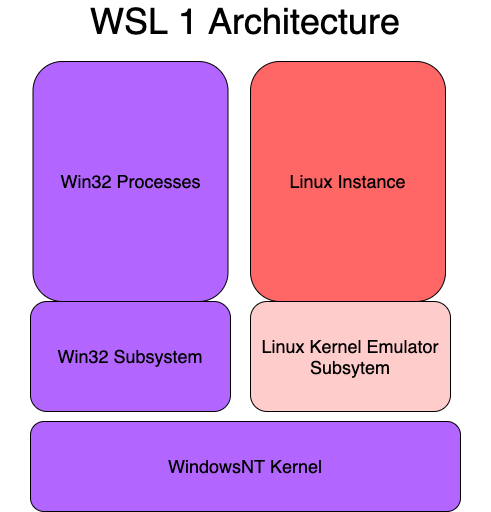
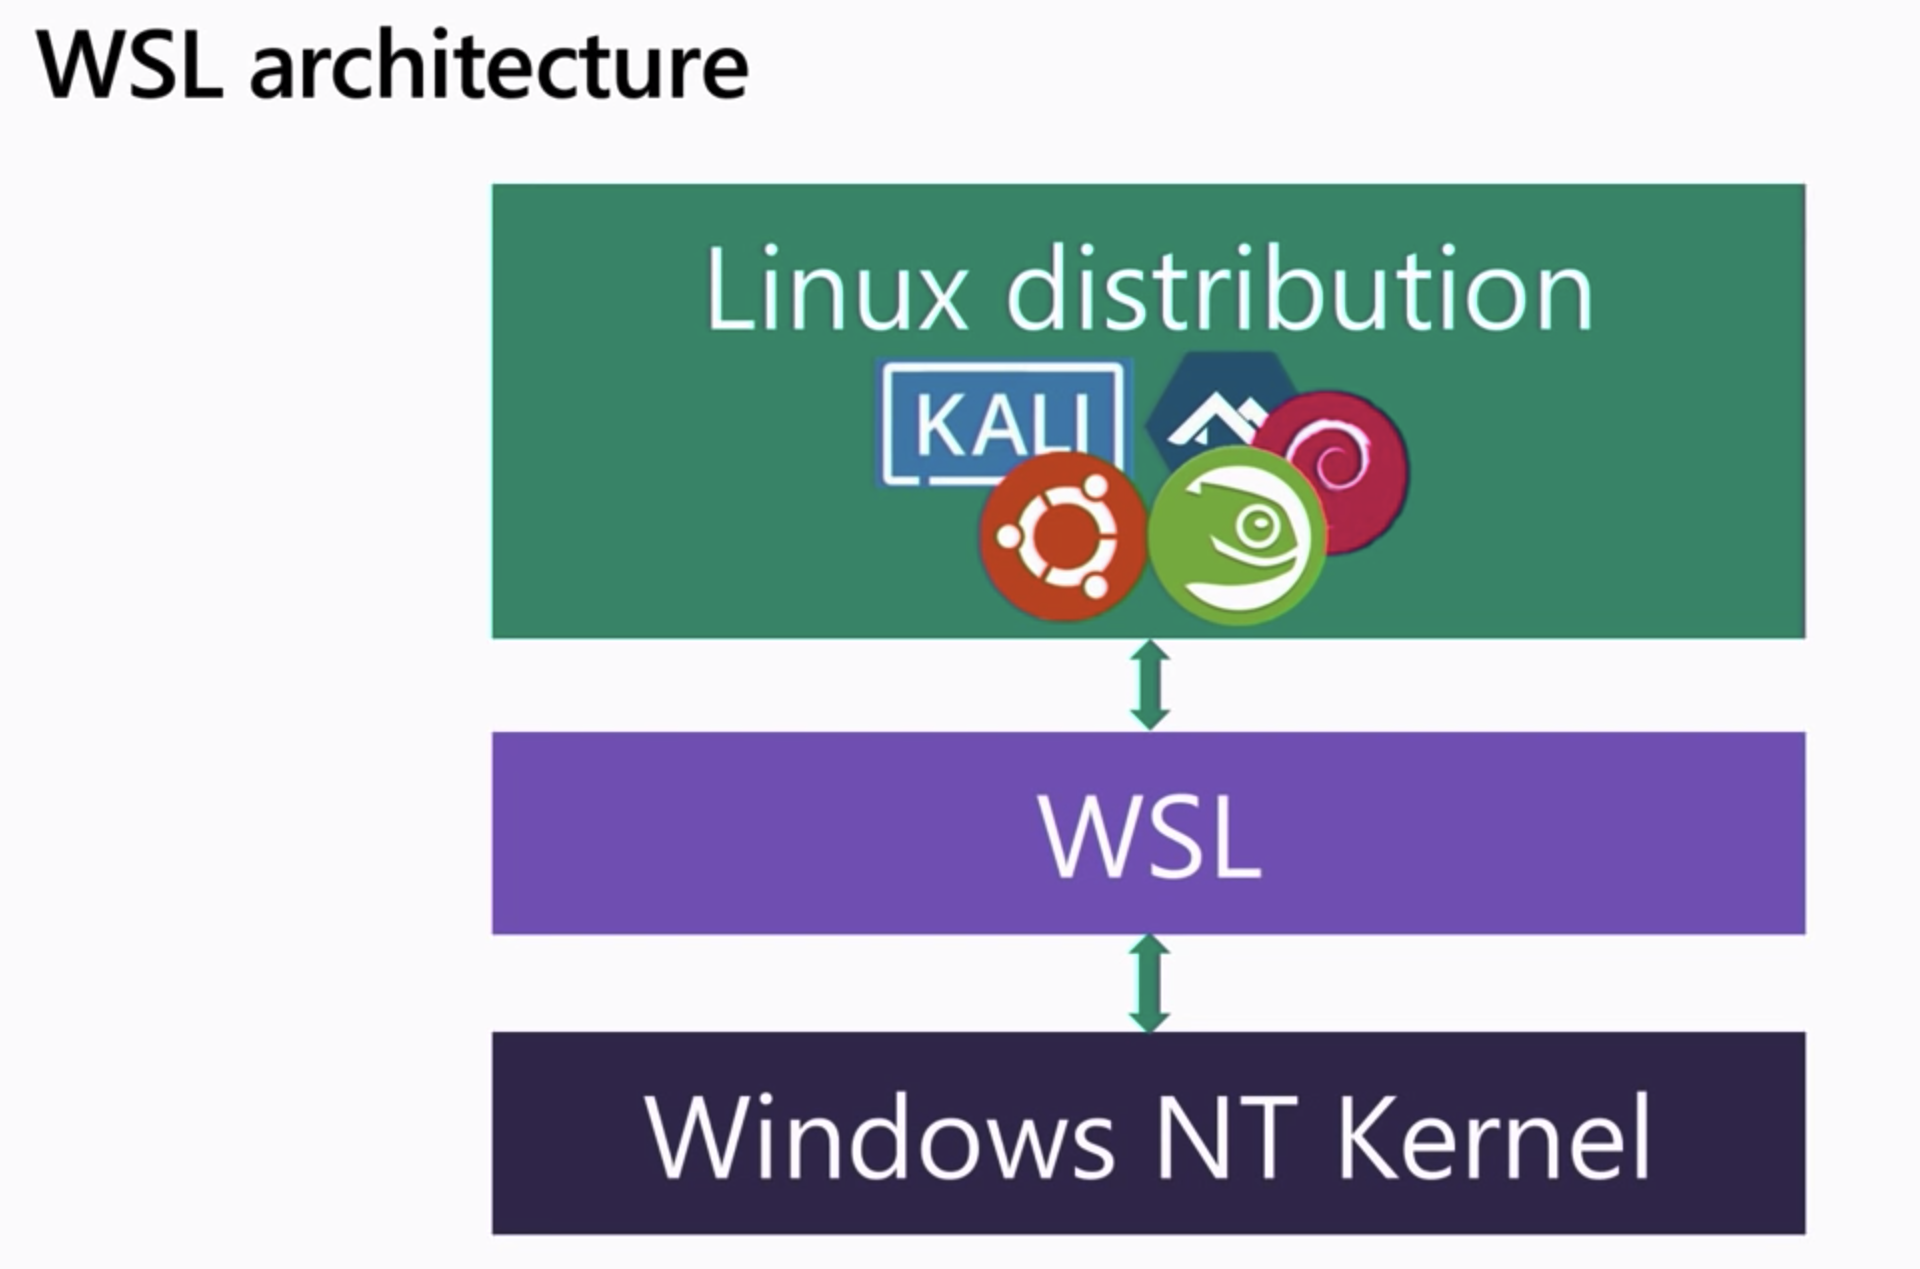
Issues with WSL1 Architecture
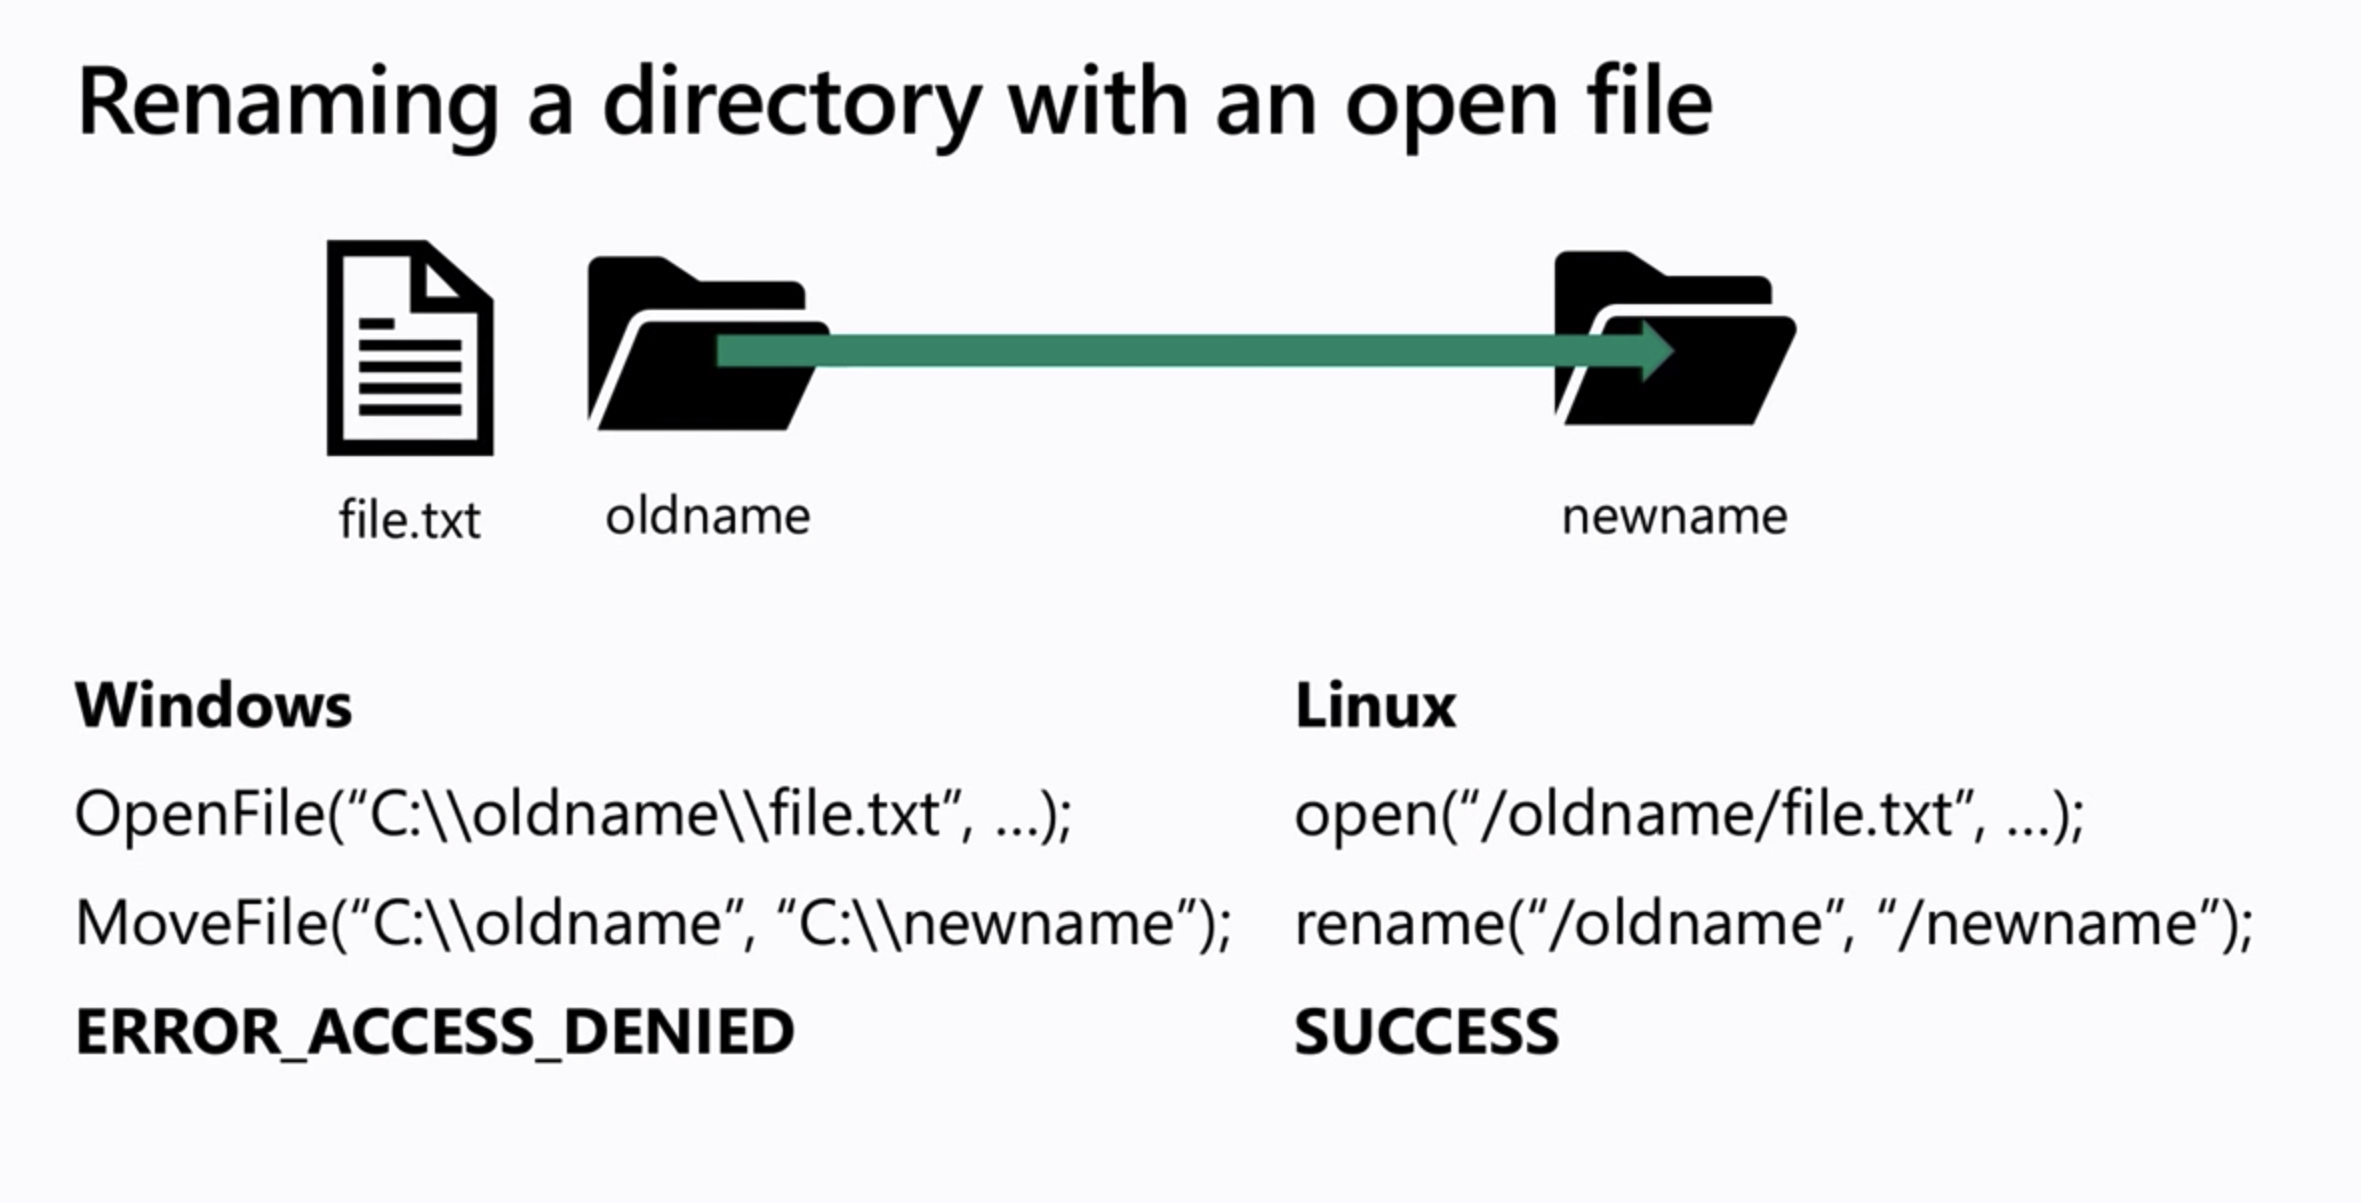
Because WLS1 architecture uses an emulated Linux Kernel as a subsystem and not a real kernel. Some system calls will not translate correctly to what windows expect, for example in the image below we see how renaming a directory while having a child file open is done on the Windows side vs the Linux side.
When Linux renames a directory it uses the open() syscall followed by the rename() syscall of the folder, allowing the folder to be moved underneath the file. However, the way Windows does this is by using the OpenFile() syscall followed by the MoveFile() syscall and it does not allow the underlying folder to be moved underneath. This will cause an ERROR_ACCESS_DENIED error. This is an example of many system calls that don’t translate correctly and therefore will not work using WSL1.
WSL2
Because of this Microsoft decided to revamp WSL and ship a real Linux Kernel, making it work side by side with the Windows NT Kernel, this is a specially tuned kernel for WSL2 managed all in-house by Microsoft and updated via Windows Update. They have modified for it to boot up very quickly and removed many things that are not needed that the windows hypervisor handles. However their upstream is the same open-source kernel from kernel.org. As you see below when you enable the Virtualization Services feature on windows 10 it deploys both kernels on a thin layer on top of the Windows Hypervisor. This is a Type 1 Hypervisor and should not be confused with Hyper-V or Hyper-V Plattform which is the client that talks to the Windows Hypervisor. This way WSL2 uses Windows Hypervisor through Virtual Machine Platform to run both Windows and Linux in their own separate VM’s, this design allows WSL2 to use a genuine Linux kernel in a separate virtual machine that runs in parallel to the Windows NT kernel. These are not traditional VM’s however, there is no Isolation since the Linux VM and Windows VM are integrated systems.
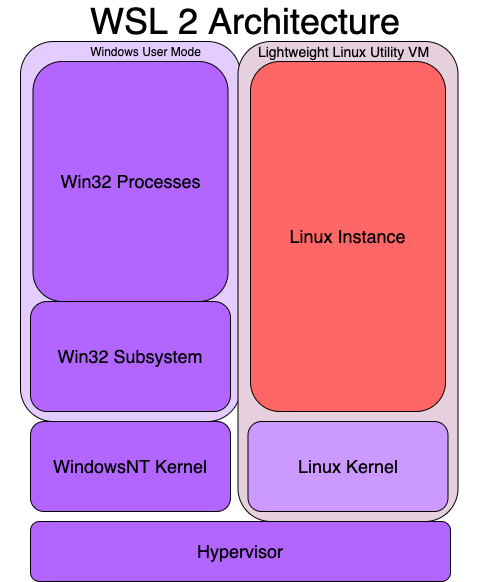
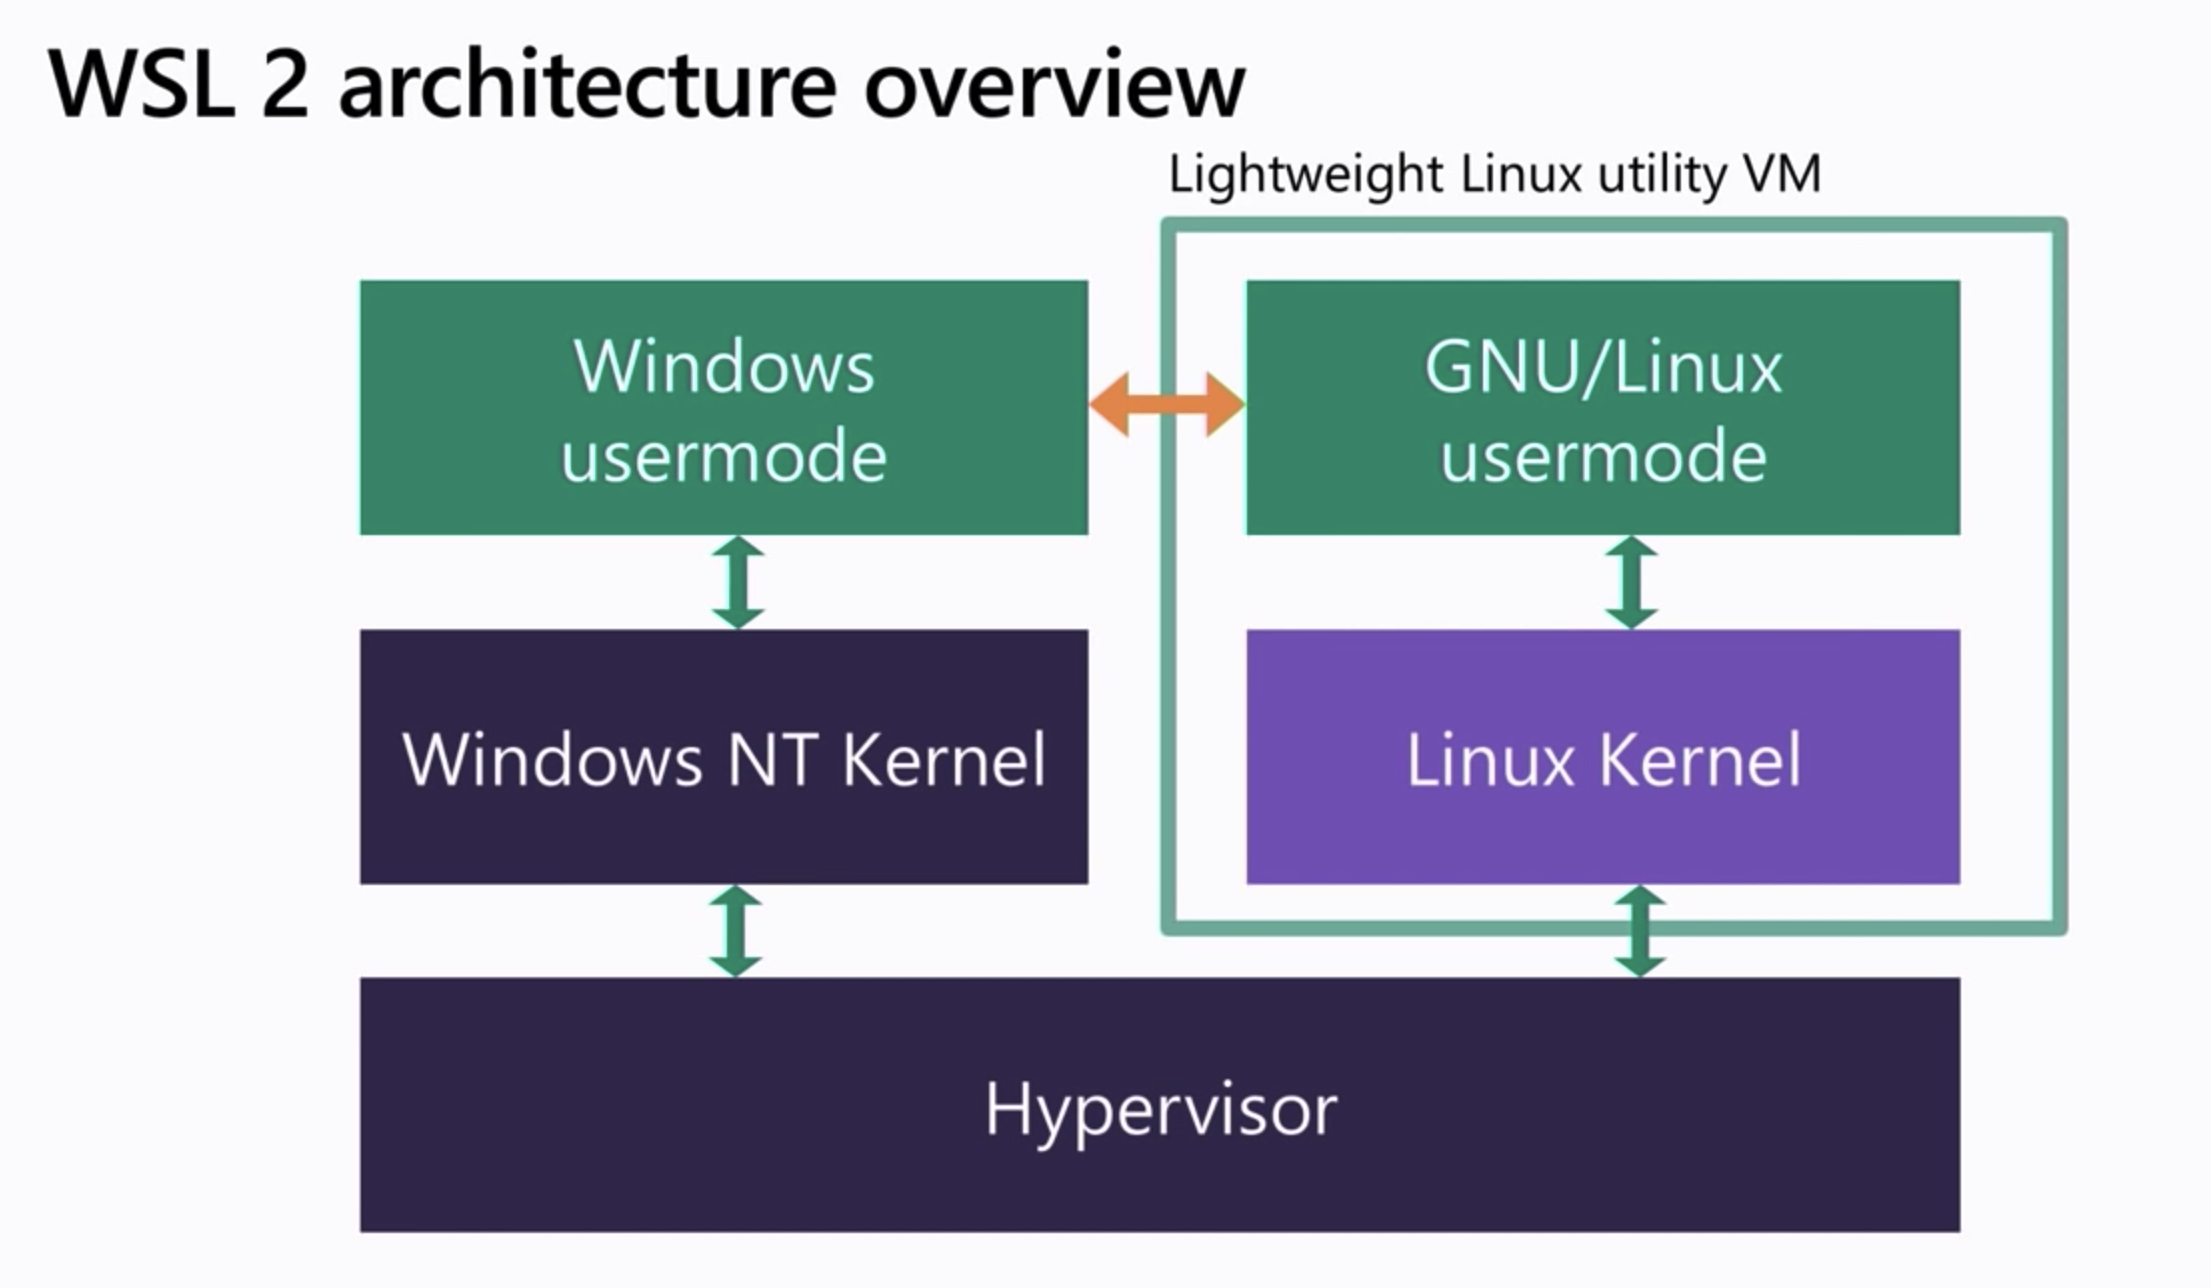
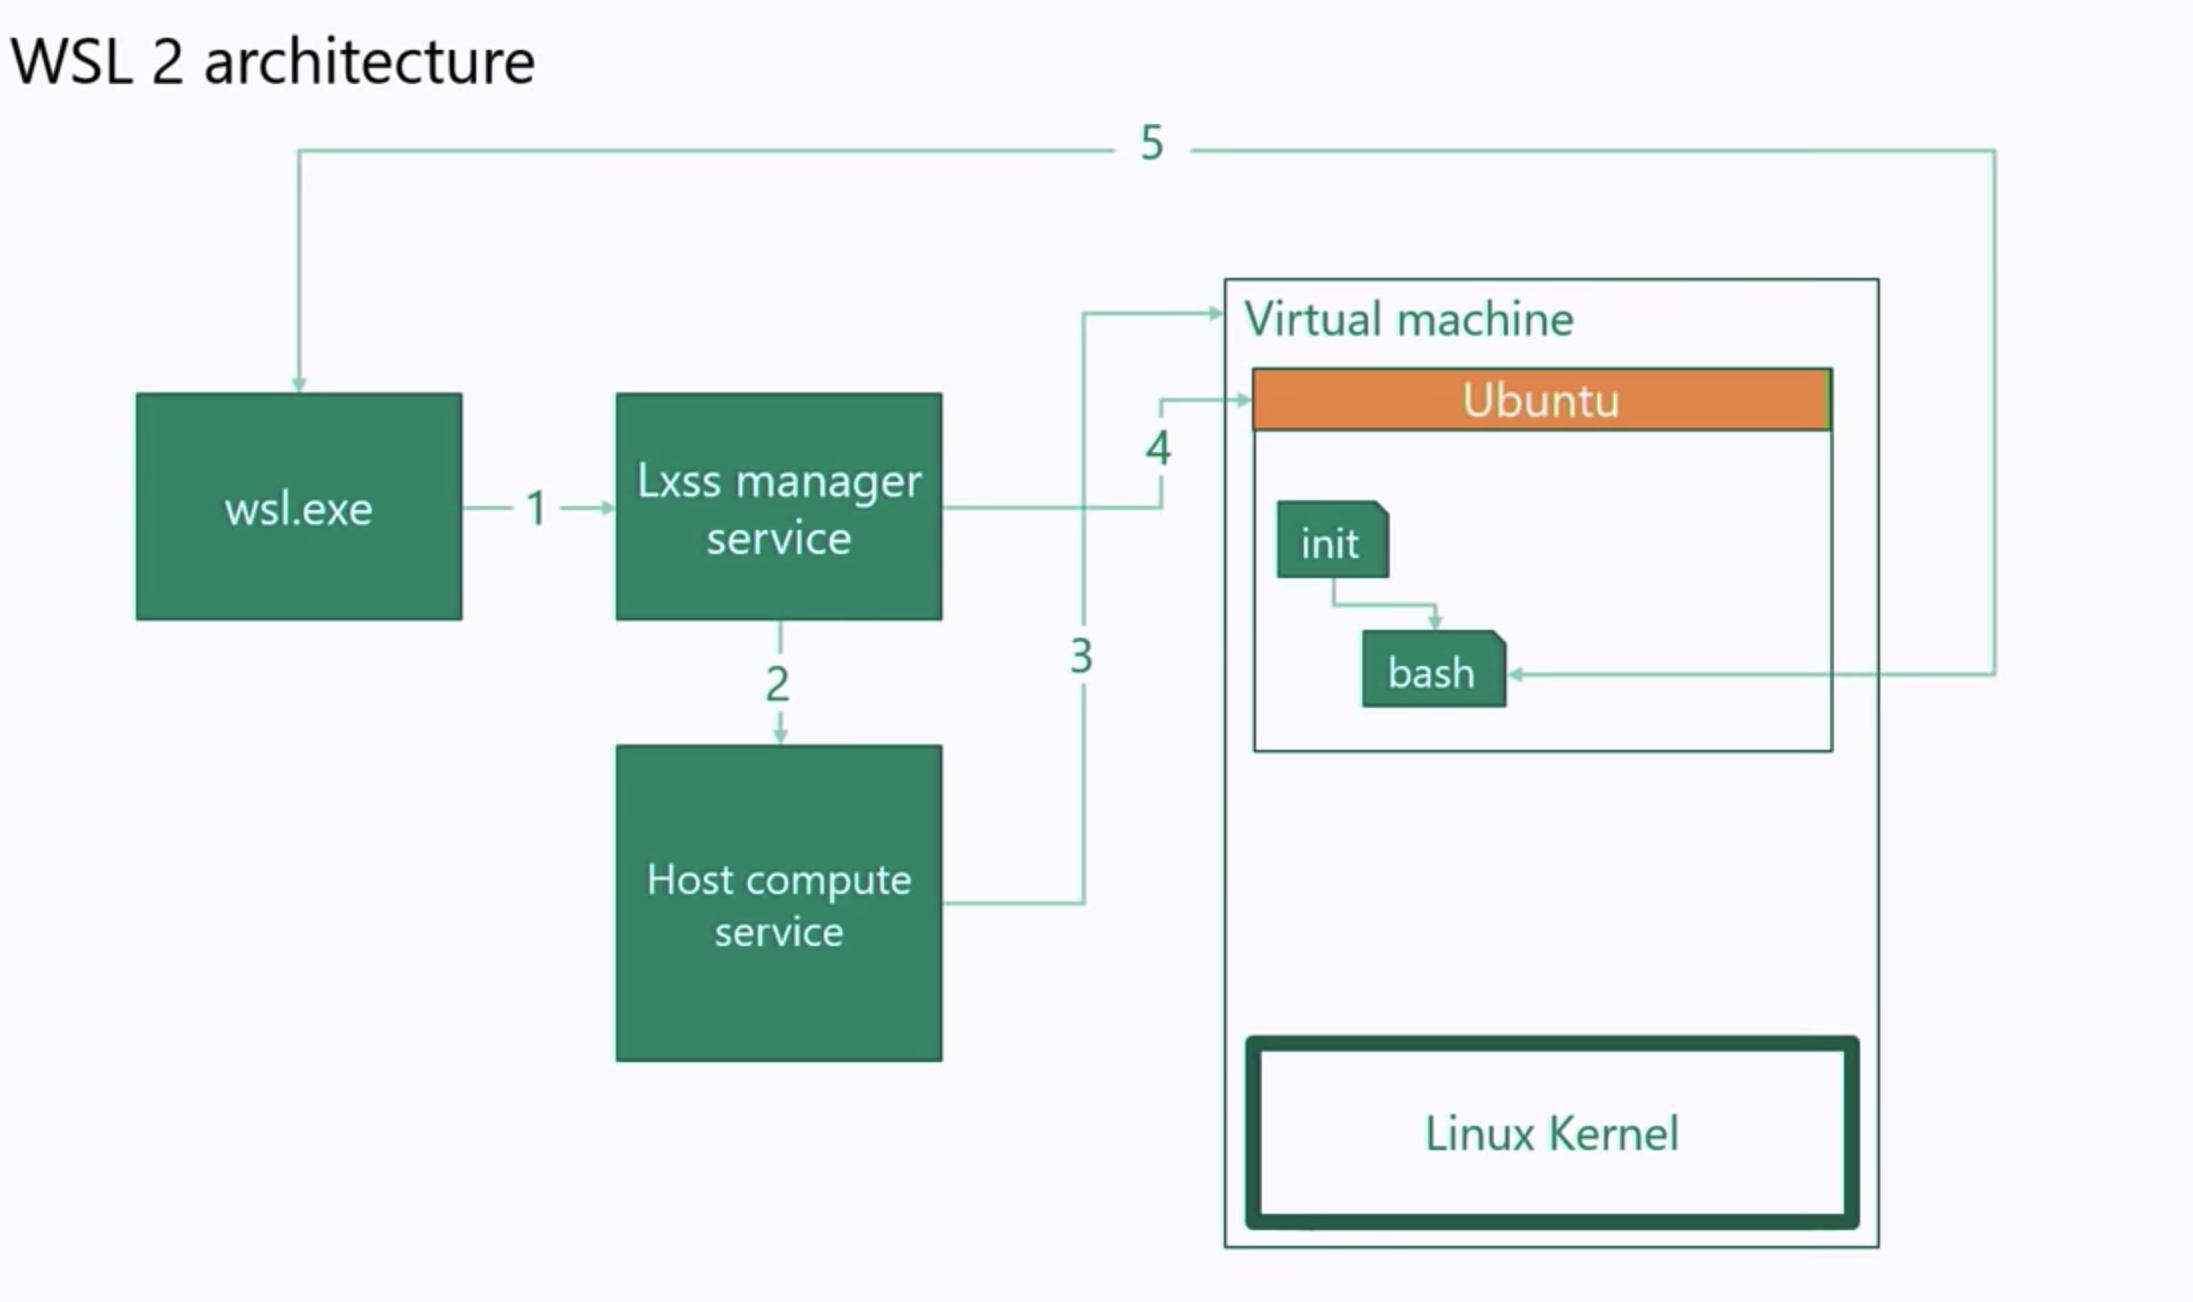
WSL2 is backed by Windows Hypervisor through Virtual Machine Platform deploying a “Lightweight Linux Utility VM” consisting of a Linux Kernel and a Linux instance allowing you to install different System Containers(not to be confused with Docker Containers or Application Containers) or distributions all isolated by Linux namespaces running on the same ext4 filesystem all within the same Lightweight Linux Utility VM.
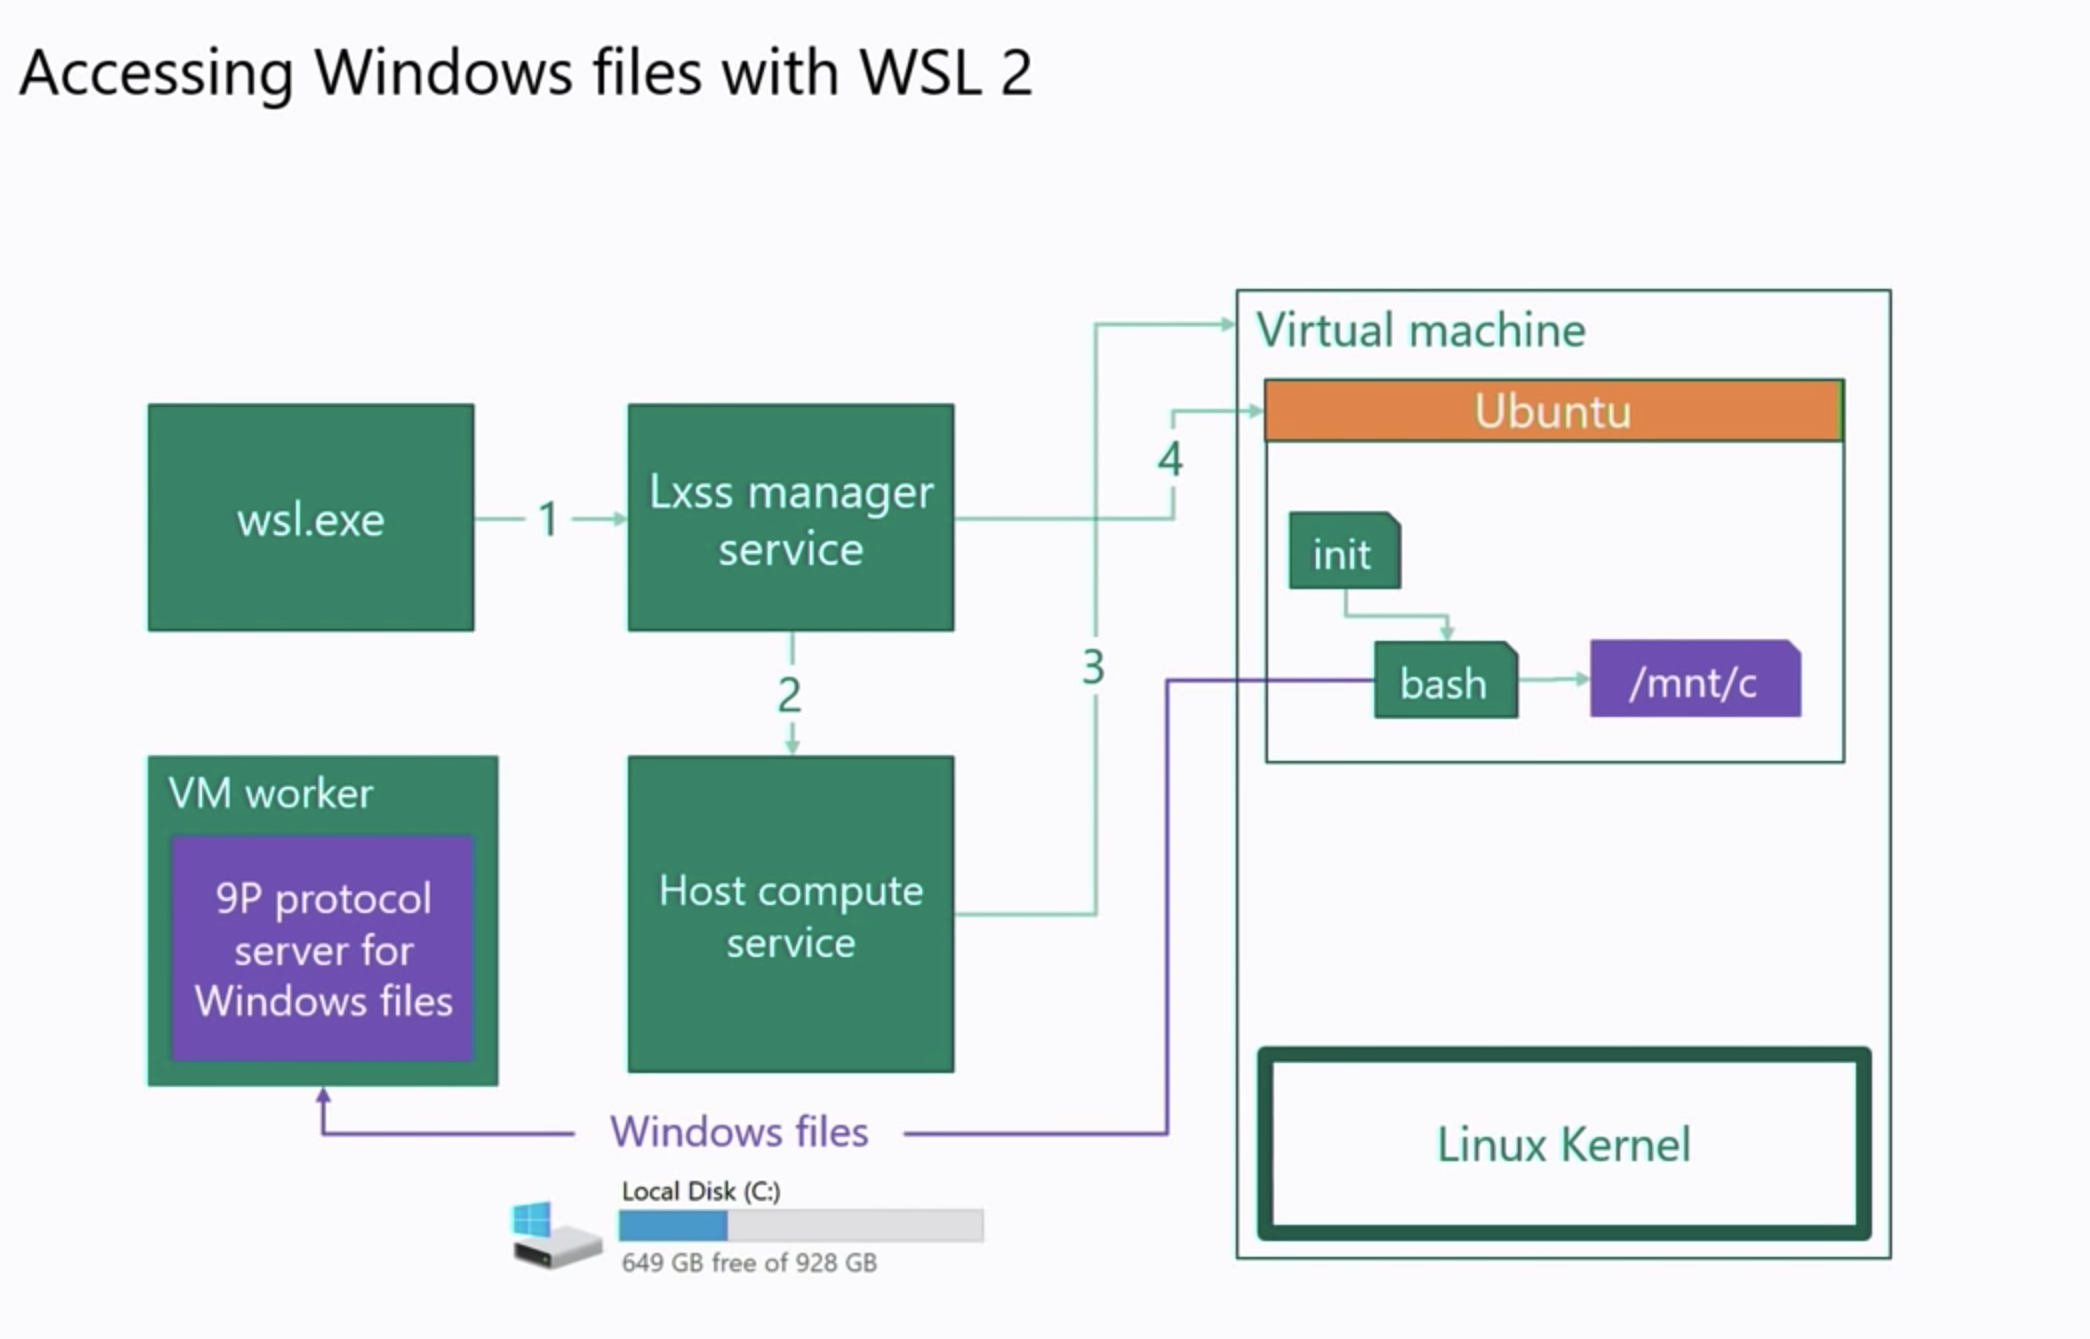
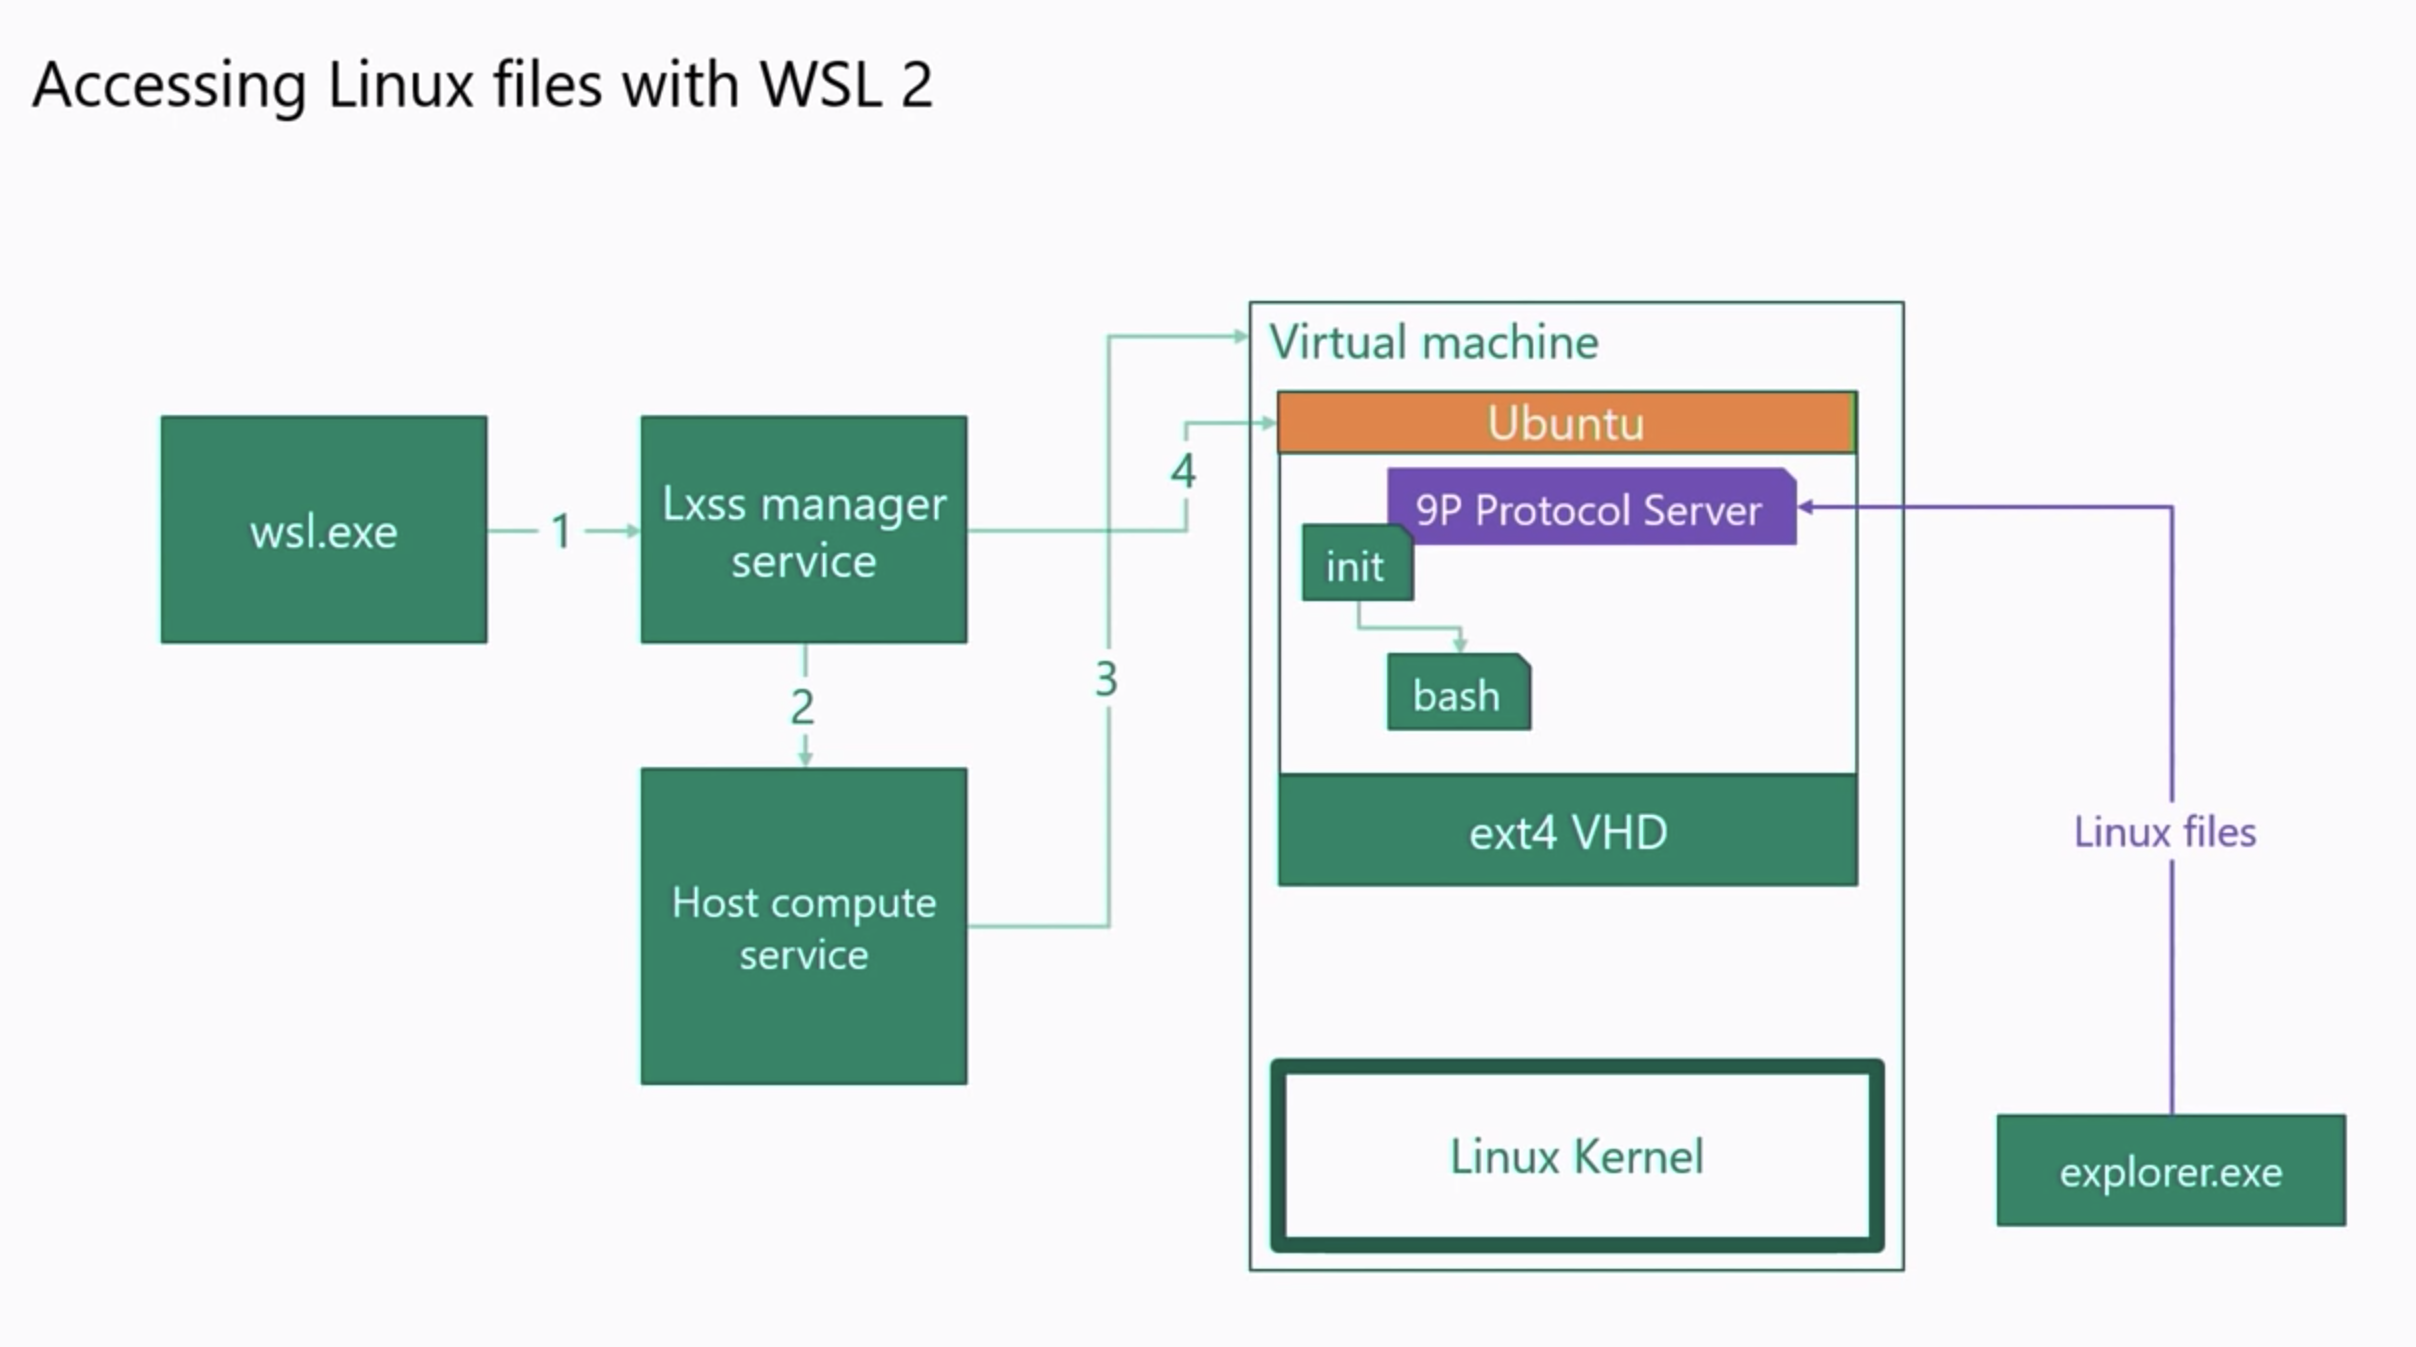
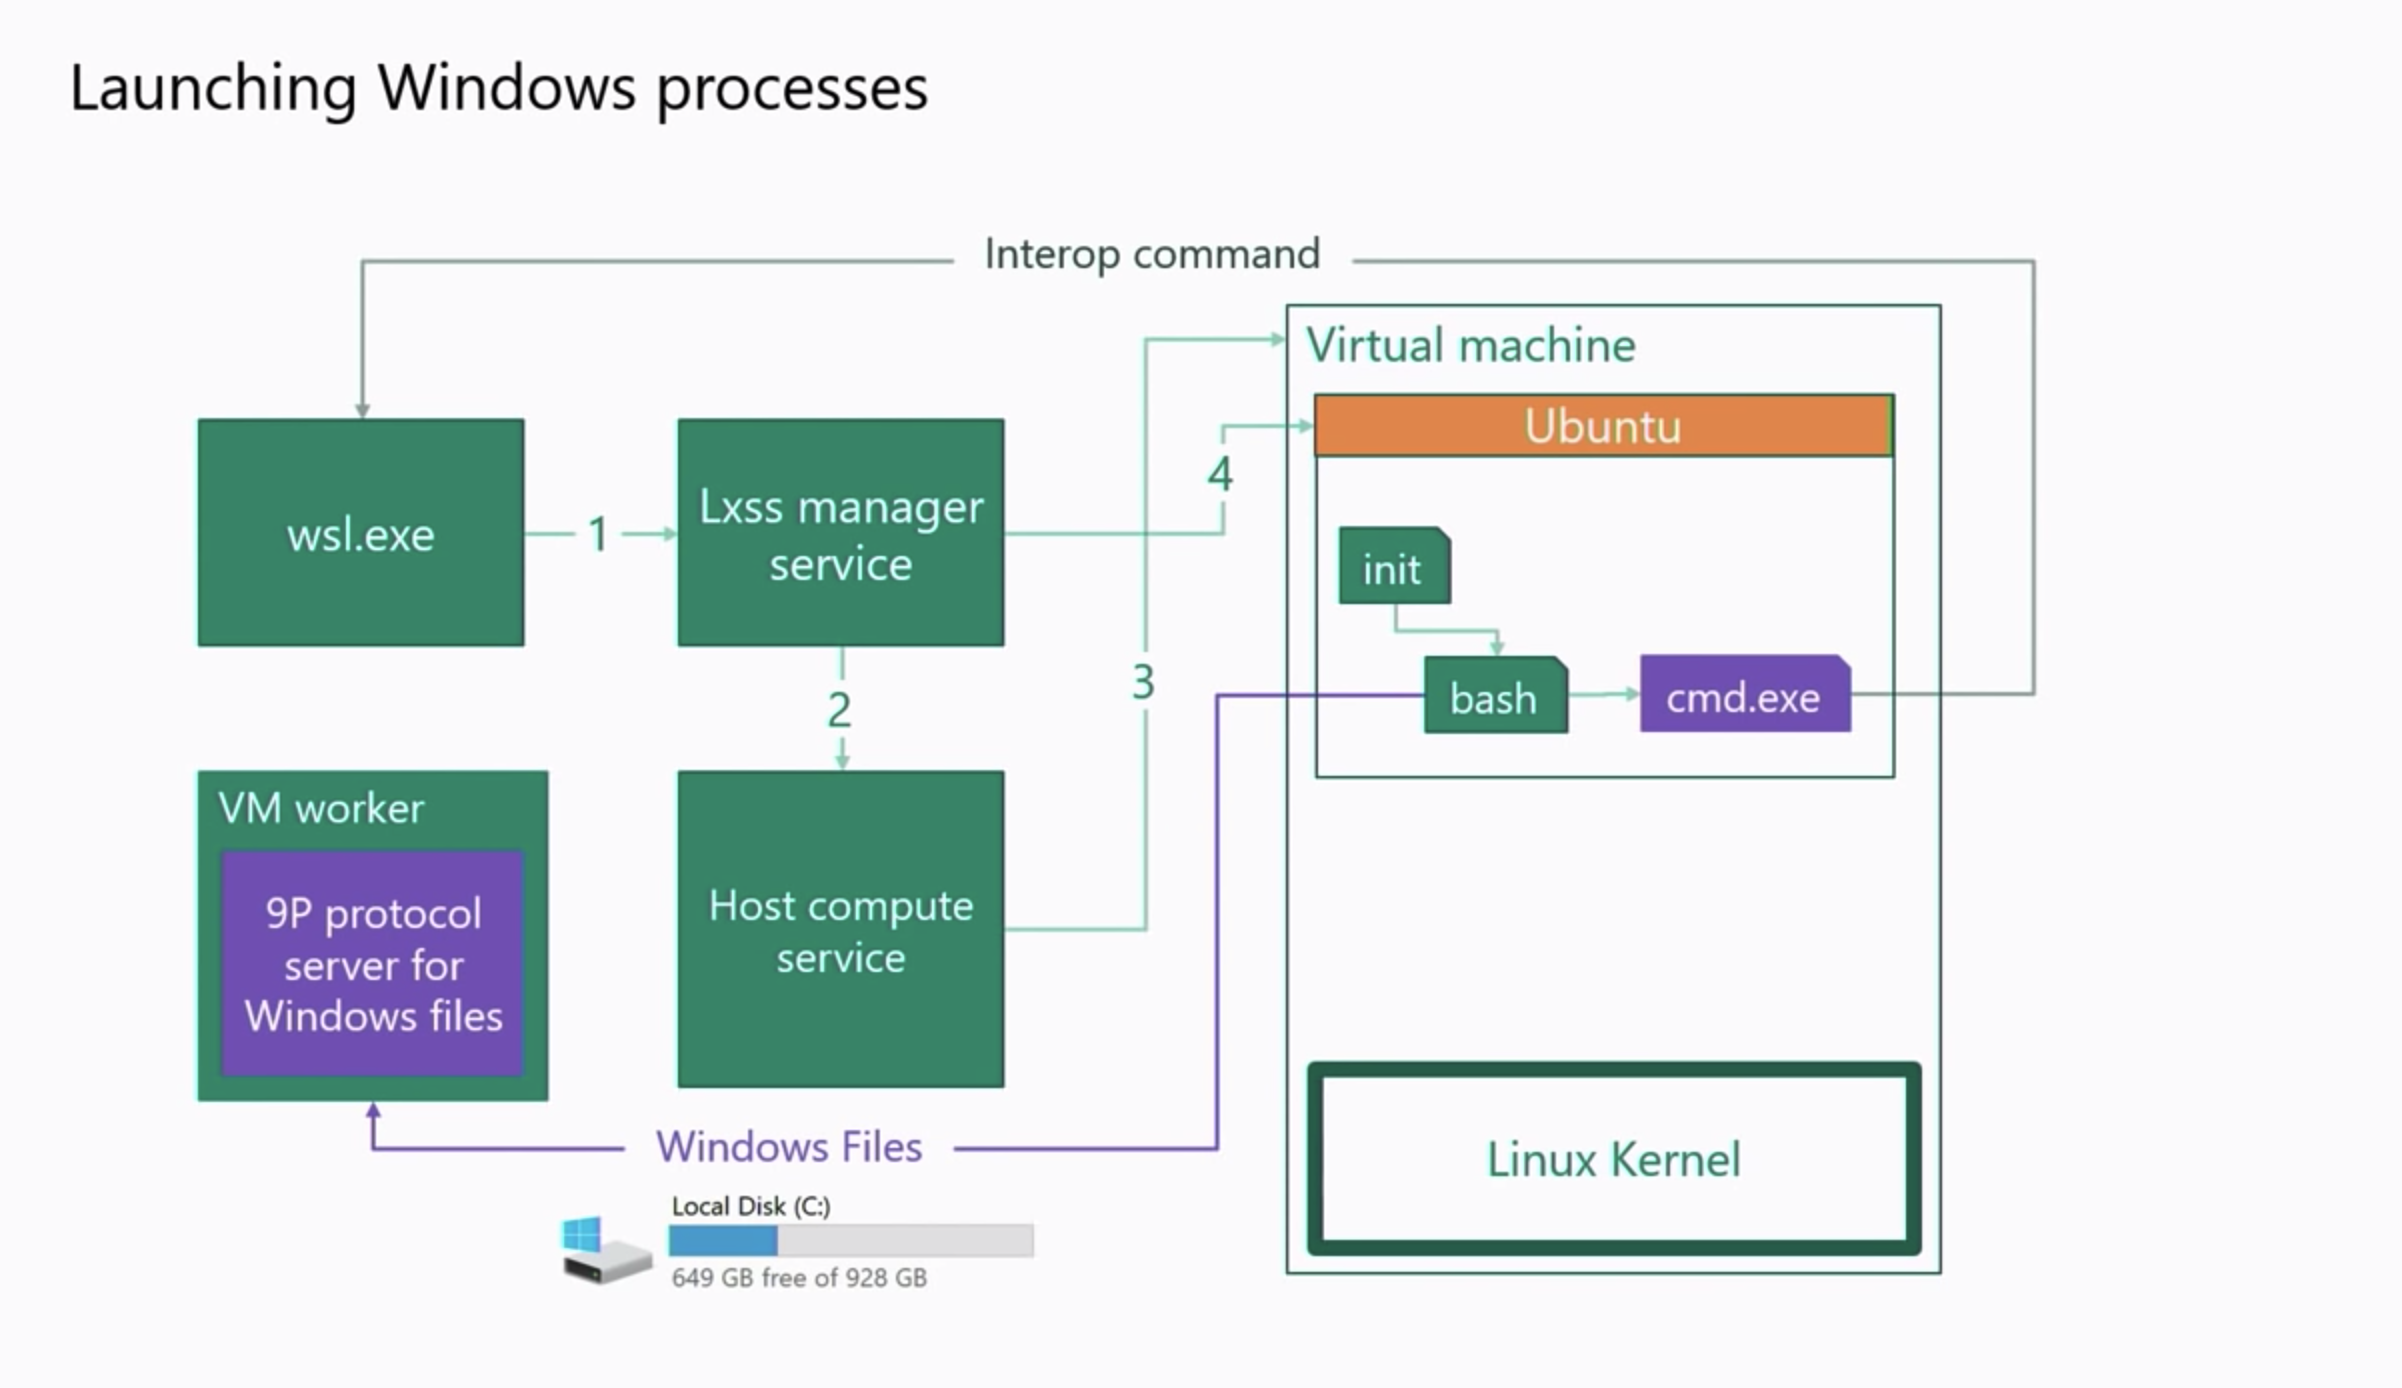
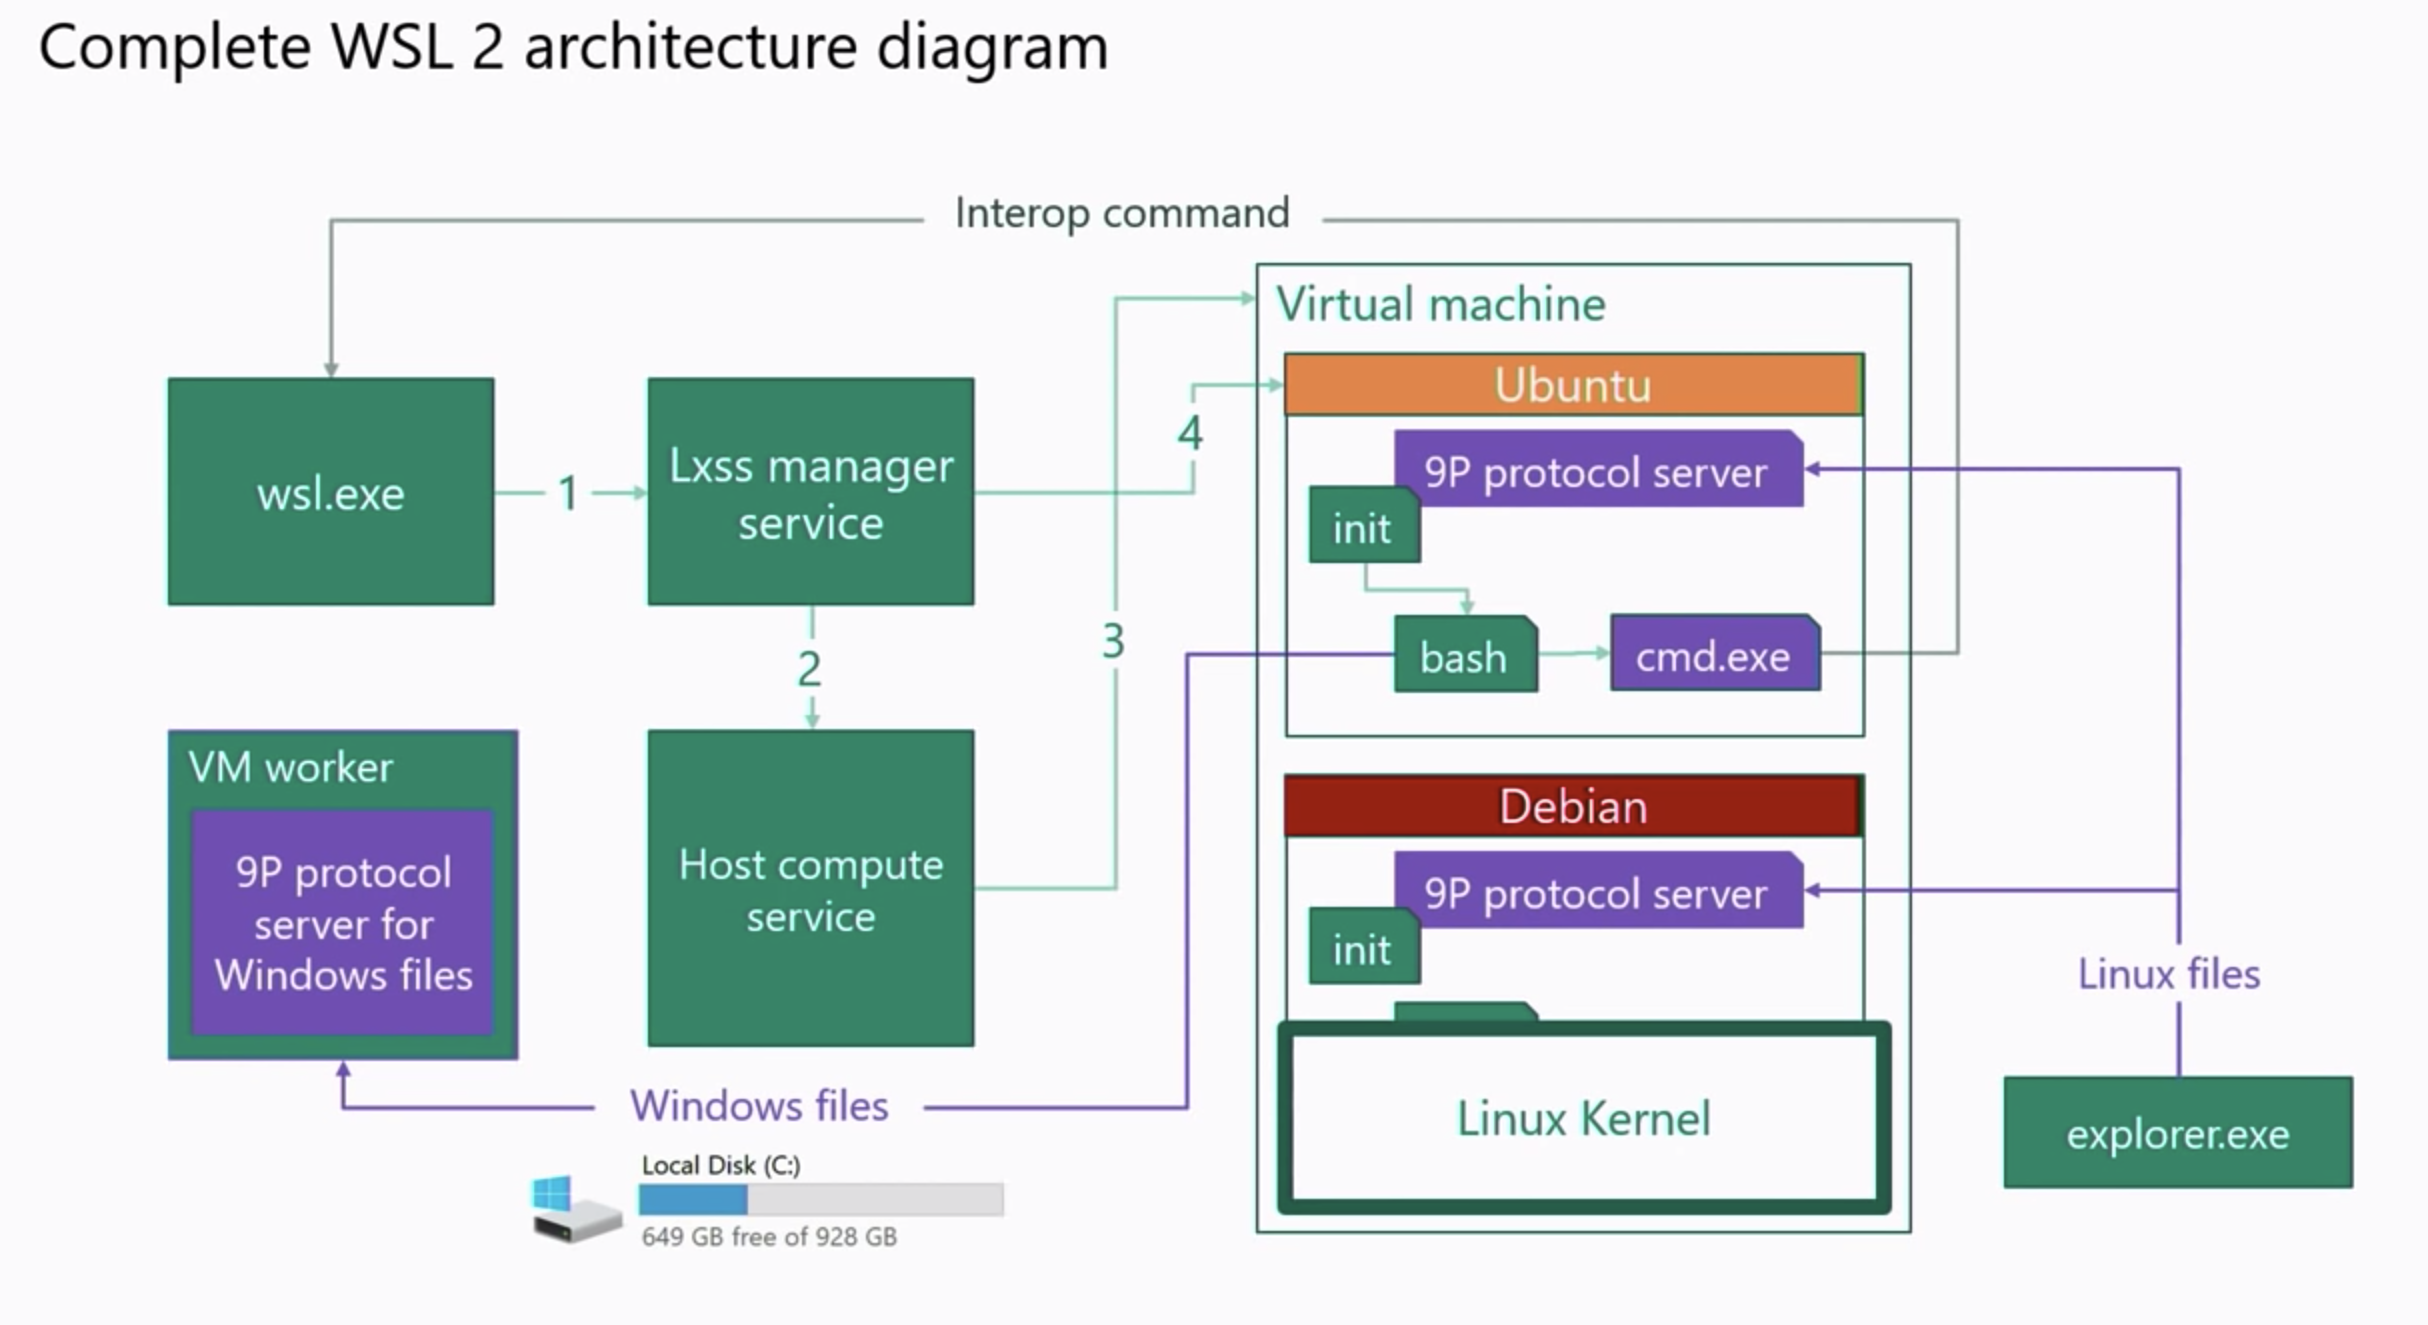
As you can see from the above image the method WSL2 mounts or makes the drives accessible is by deploying a client both on the distribution and the windows side, and also a server on the Linux distro and windows side using the 9P protocol. Almost like an NFS share. As you can see you can also start/manage windows programs using the same protocol in the case above it opens up the cmd.exe program.
Additional Features Over WSL1
- wsl2 uses a real Linux kernel shipped with windows, built using the Linux 4.19 kernelext4 root filesystem
- /etc/wsl.conf - this is a configuration file that will allow you to add or remove features for wsl
- wslpath - translates paths from one environment to the other
- $WSLENV - share environment variables between Linux and windows
NOTE: Although WSL2 gives us the ability to build and distribute our own WSL2 distros, Docker Desktop does not allow other distros to be used other than the one it ships with.
Docker Desktop Deep Dive
Docker Desktop Deep Dive In the past Docker bundled all the functionality into the Docker daemon which made it bloated and centralized, this made the Docker daemon a central attack vector. This was later corrected and overhauled into separate components which makes it simpler to secure since each component can be handled and secured individually, this is what gave the ability for Docker to be ported over to desktops.
Docker communication is facilitated through the use of several API’s. The Docker Client itself communicates with the daemon through a domain(UNIX) socket, or remotely through a TCP socket. The commands are sent from the Docker client to the Docker Engine which then forwards the calls to Containerd. Communication between the Docker Dameonn and Conatinerd is facilitated through the gRPC ( remote procedure call protocol) protocol. Containerd utilizes a runtime specification, usually “runc” to create the actual containers.
Some changes were made in Docker Desktop 2.2.0
- FUSE-based filesharing protocol within docker containers
- Windows Hypervisor sockets instead of the Hyper-V networking
- Runs with User privilege.
- No need to authenticate or handle passwords
- No need for IP or to manage addresses
- Supports Caching and inotifiy
- Kubernetes
- WSL2 uses the latest stable Docker daemon
- The ability to use vpnkit
- The ability to use HTTP proxy settings and trusted CA
In order to install and run Docker Desktop with a WSL2 backend, it is recommended to follow these instructions to install WSL2 then these instructions to install Docker Desktop and enable the WSL2 support. Since the installation wizard will see WSL2 is enabled and will install any applicable utilities needed.
There are two main ways to run Docker on Windows. The first method will be using Hyper-V as the backend which is the original method, it gives us a full isolated Linux VM but is very slow and will be deprecated in the near future. The second method is using WSL2 this is much faster given that it’s an integrated system and will more than likely be the defacto going forward.
Hyper-V Backend
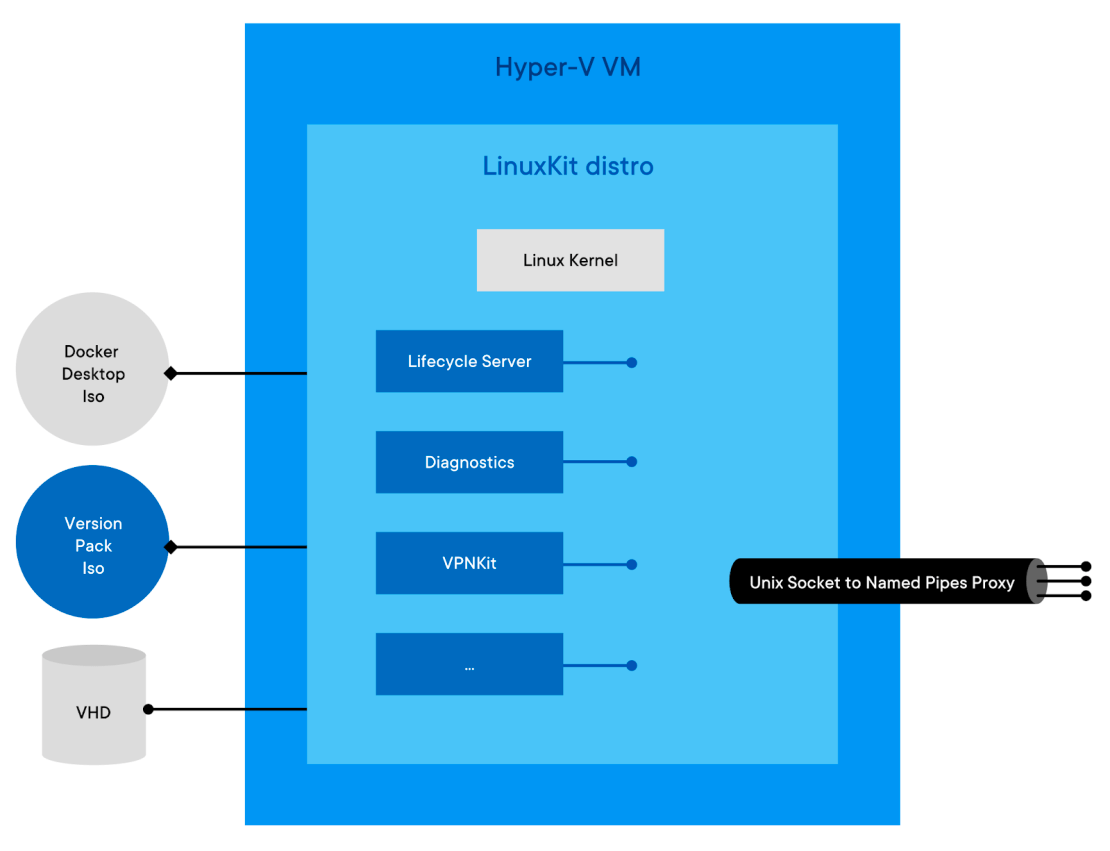
Docker on Desktop running on with a Hyper-V Backend is completely different than running on WSL2. The most important thing to note with this method is the Linux VM that ships with Docker for Hyper-V. This Linux VM is entirely built using LinuxKit, Docker wrote a number of LinuxKit components, used both in Hyper-V and Mac VMs: services controlling the lifecycle of Docker and Kubernetes, services to collect diagnostics in case of failure, services aggregating logs, etc. Those services are packaged in an iso file in the Docker Desktop installation directory (docker-desktop.iso). On top of this base distro, at runtime, the second iso is mounted, which calls a version-pack iso. This file contains binaries and deployment/upgrade scripts specific to a version of the Docker Engine and Kubernetes. In the Enterprise edition, this second iso is part of the version packs docker publishes, while in the Community Editon, a single version pack is supported (the docker.iso file, also present in the docker desktop installation folder). Before starting the VM, a VHD is attached to store container images and configs, as well as the Kubernetes data store. To make those services accessible from the Windows side, Docker built a proxy that exposes Unix sockets as Windows named pipes, using Hyper-V Sockets under the hood.
WSL2 Backend
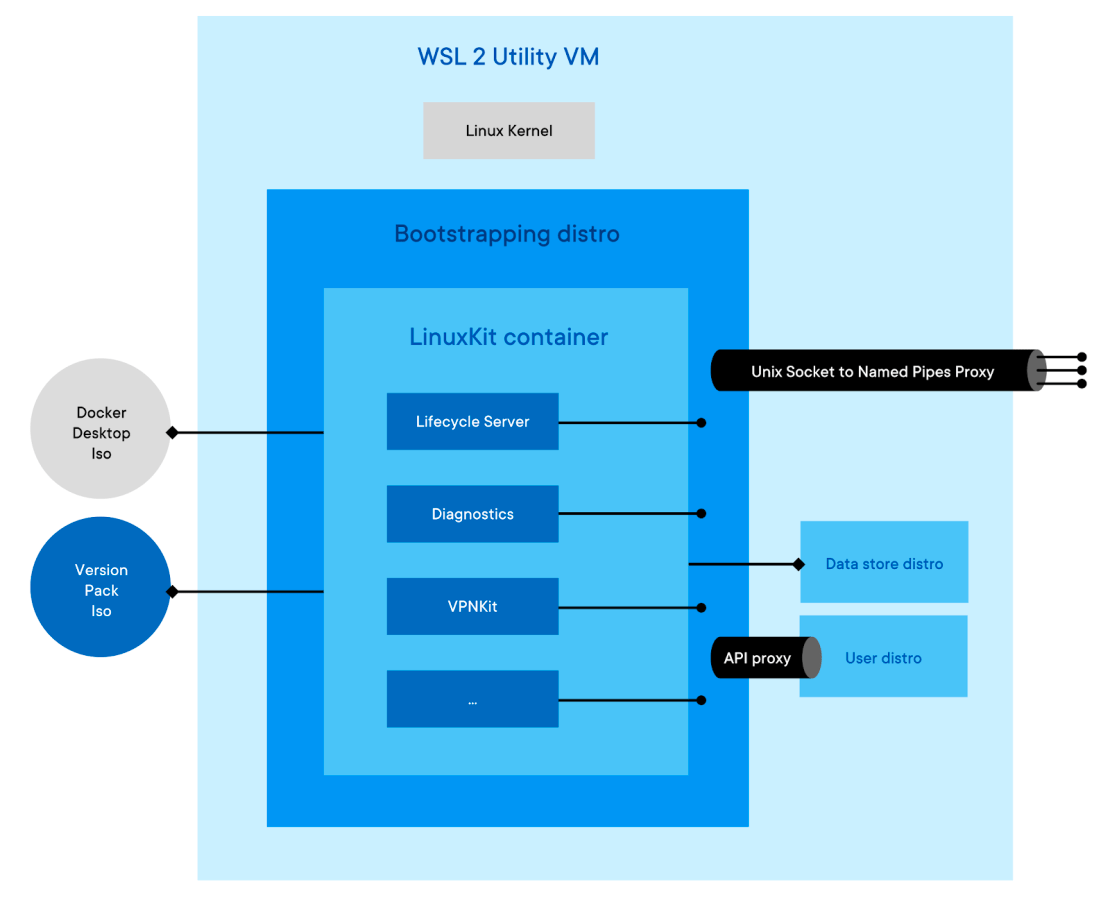
The WSL2 backend is very similar to the Hyper-V backend with the biggest change being that the Linuxkit Distro does not run as a VM but rather as a container itself(not a Docker/OCI container, rather containerized using namespaces). When we first install Docker Desktop with a WSL2 backend, the installation wizard will create two separate WSL Distributions. “Docker-desktop” which is referred to as the “Bootstrapping distro” essentially replacing Hyper-V and the “Docker-desktop-data” which is referred to as the “data store distro” also replacing what we would normally think of as our VHD.
The bootstrapping distro creates a Linux Namespace with its own root filesystem based on the Docker Desktop ISO and the Version Pack ISO files, then uses the “data store distro” as storage for container images, etc. Instead of a VHD, since WSL2 does not allow additional VHD’s to be other than the main one that is used for the Light Weight Linux Utility VM, cross-distro mounts are used instead.
One thing to note is because WSL2 comes with a Linux kernel and system services these have been taken out of the docker-desktop.iso file being used. The version-pack.iso file is identical to the Hyper-V(and Mac).
The Bootstrapping distro also manages things like mounting the Windows 9p shares in a place that can be accessed by the Linuxkit container and controls the lifecycle of the Linuxkit container ensuring things like a clean shutdown etc. This lets Docker run in a contained environment similar to the Hyper-V and Mac VM’s. so that no matter what backend Docker is using Hyper-V, WSL2, or Hyperkit for Macs the same code base is used for the Linuxkit components.
Some other benefits over Hyper-V are the time difference it takes to start docker containers, and because WSL2 uses dynamic resource allocations it can access all the resources of the machines and consume as much or as little as it needs. This makes it easier to run in environments with lower memory where it was previously difficult to allocate 2GB of ram for Hyper-V upfront, this also allows for support in Windows versions where Hyper-V is not available such as Windows Home edition.
NOTE: As stated above although we have the ability to create our own WSL2 Distros, Docker Desktop will not let use our own.
VPNKIT
The Docker for Windows VM is running on top of Hyper-V. vpnkit on the host uses Hyper-V sockets to connect to a process (tap-vsockd) inside the VM which accepts the connection and configures a tap device. Frames are encapsulated using the same custom protocol as on the Mac.
Frames arriving from the VM are processed by a simple internal ethernet switch. The switch demultiplexes traffic onto output ports by matching on the destination IPv4 address. Frames that don’t match any rule are forwarded to a default port.
Frames arriving on the default port are examined and if they contain ARP requests, we send a response using a static global ARP table if they contain IPv4 datagrams then we create a fresh virtual TCP/IP endpoint using the Mirage TCP/IP stack (no kernel TCP/IP interfaces are involved), a fresh switch port on our internal switch, and connect them together so that all future IPv4 traffic to the same destination address is processed by the new endpoint. Each virtual TCP/IP endpoint terminates TCP and UDP flows using the Mirage TCP/IP stack. The data from the flows is proxied to and from regular BSD-style sockets on both Windows and Mac. The host kernel therefore only sees outgoing SOCK_STREAM and SOCK_DGRAM connections from the vpnkit process.
If the VM is communicating with 10 remote IP addresses, then there will be 10 instances of a Mirage TCP/IP stack, one per IP address. The TCP/IP stack instances act as proxies for the remote hosts.
The following diagram shows the flow of ethernet traffic within VPNKit:
Each switch port has an associated last_active_time and if there is no traffic flow for a configured time interval, the port is deactivated and the TCP/IP endpoint is shutdown.
The active ports may be queried by connecting to a Unix domain socket on the Mac or a named pipe on Windows and receiving diagnostic data in a Unix tar formatted stream.
What happens when an application inside a container in the Linux VM tries to make a TCP connection:
- the application calls connect
- the Linux kernel emits a TCP packet with the SYN flag set
- the Linux kernel applies the iptables rules and consults the routing table to select the outgoing interface and then transmits the frame
- the frame is relayed to the host
- the interface was a tap device created by the tap-vsockd process. This process reads the frame from the associated file descriptor, encapsulates it and writes it to the Hyper-V socket connected to vpnkit.
- the frame is received by vpnkit and input into the ethernet switch.
- if the destination IP is not recognised: vpnkit creates a TCP/IP endpoint using Mirage TCP/IP stack with the destination IP address and configures the switch to send future packets with this destination IP to this endpoint
- if the destination IP is recognised: the internal switch inputs the frame into the TCP/IP endpoint
- the TCP/IP endpoint observes the SYN flag is set and so it calls the regular connect API to establish a regular SOCK_STREAM connection to that destination.
- if the connect succeeds: the TCP/IP endpoint sends back a packet with the SYN and ACK flags set and the handshake continues
- if the connect fails: the TCP/IP endpoint sends back a packet with the RST flag set to reject the connection.
If all has gone well, the VM now has a TCP connection over a virtual point-to-point ethernet link connected to vpnkit, and vpnkit has a socket connection to the true destination. vpnkit will now proxy the data in both directions.
Note that from the host kernel’s point of view, there is no network connection to the VM and no set of associated firewall rules or routing tables. All outgoing connections originate from the vpnkit process. If the user installs some advanced networking or VPN software which reconfigures the routing table or firewall rules, it will not break the connection between vpnkit and the VM.
This technique for forwarding network connections is commonly known as Slirp.
Docker Desktop Security Considerations and Securing Docker Desktop
We have decided to use Docker Desktop with a WSL2 backend. Because of this the rest of the document will only speak to Docker Desktop with a WSL2 Backend using the Docker provided WSL2 Distrbitutions.
Non-Docker Specific Considerations
As of Windows 10, 1803 and later “lxrun.exe” has been deprecated. It was used to set up and configure the Linux distributions that were installed in WSL. It was in this configuration that we were forced to set up a username and password for the distro as to not run as a root inside the distro from the get-go. However, there seems to be a flaw when deploying a distribution, when the system is determining the UNIX user and password. If the terminal associated with the deployment is terminated during the initial operation there is no defined user set and instead, the default process is to access the root account without credentials. Effectively replicating the automated setup for the default root user that is normally generated with “lxrun.exe”. By running a termination loop during the configuration you are guaranteed that WSL access is at the root level every time.
However, for installing or running any sort of persistence method the attacker must run either the “bash.exe”, “wsl.exe” or distro-specific “.exe” such as “kali.exe”. Which in turn creates a “C:\Windows\system32\lxss\wslhost.exe” binary to command and/or initiate the WSL instance. It is not possible to automatically run the WSL instance by starting the associated services automatically, which means these binaries need to be called in order for it to start. Today the Linux instance is not configured with the ability for an automated service initiation system such as “init” or “systemd”.So any payloads which need persistence must be implemented through a windows level mechanism which should be able to be detected by our monitoring tools and processes.
Another observation should be made that the WSL2 is set to terminate itself after 1 minute if no actions or processes are running on it. For example, if a user runs some processes or scripts and then terminates the shell or session, Windows Hypervisor will wait one minute and then terminate it. However, if a background process is running on the subsystem instance then it will not terminate and run for as long as the process or service is active.
Because WSL2 is an integrated system WSL2 by default mounts the entire C drive and makes it accessible from within the Linux Distribution, because of this you are able to create, edit, and delete files from within the Linux distro. However, it does seem that even though you are root inside the distro without some sort of privilege escalation you cannot create or modify files and directories which you do not have access to on the Windows side.
Here I am an admin on the windows machine creating a file from within the Distro inside WSL2.

Here I am an admin on the windows machine creating a file from within Windows and it’s accessible within WSL2.

Here I am a regular user on the windows machine but root from within the Distro inside WSL2.

By default, this is everything mounted on any WSL2 distro.
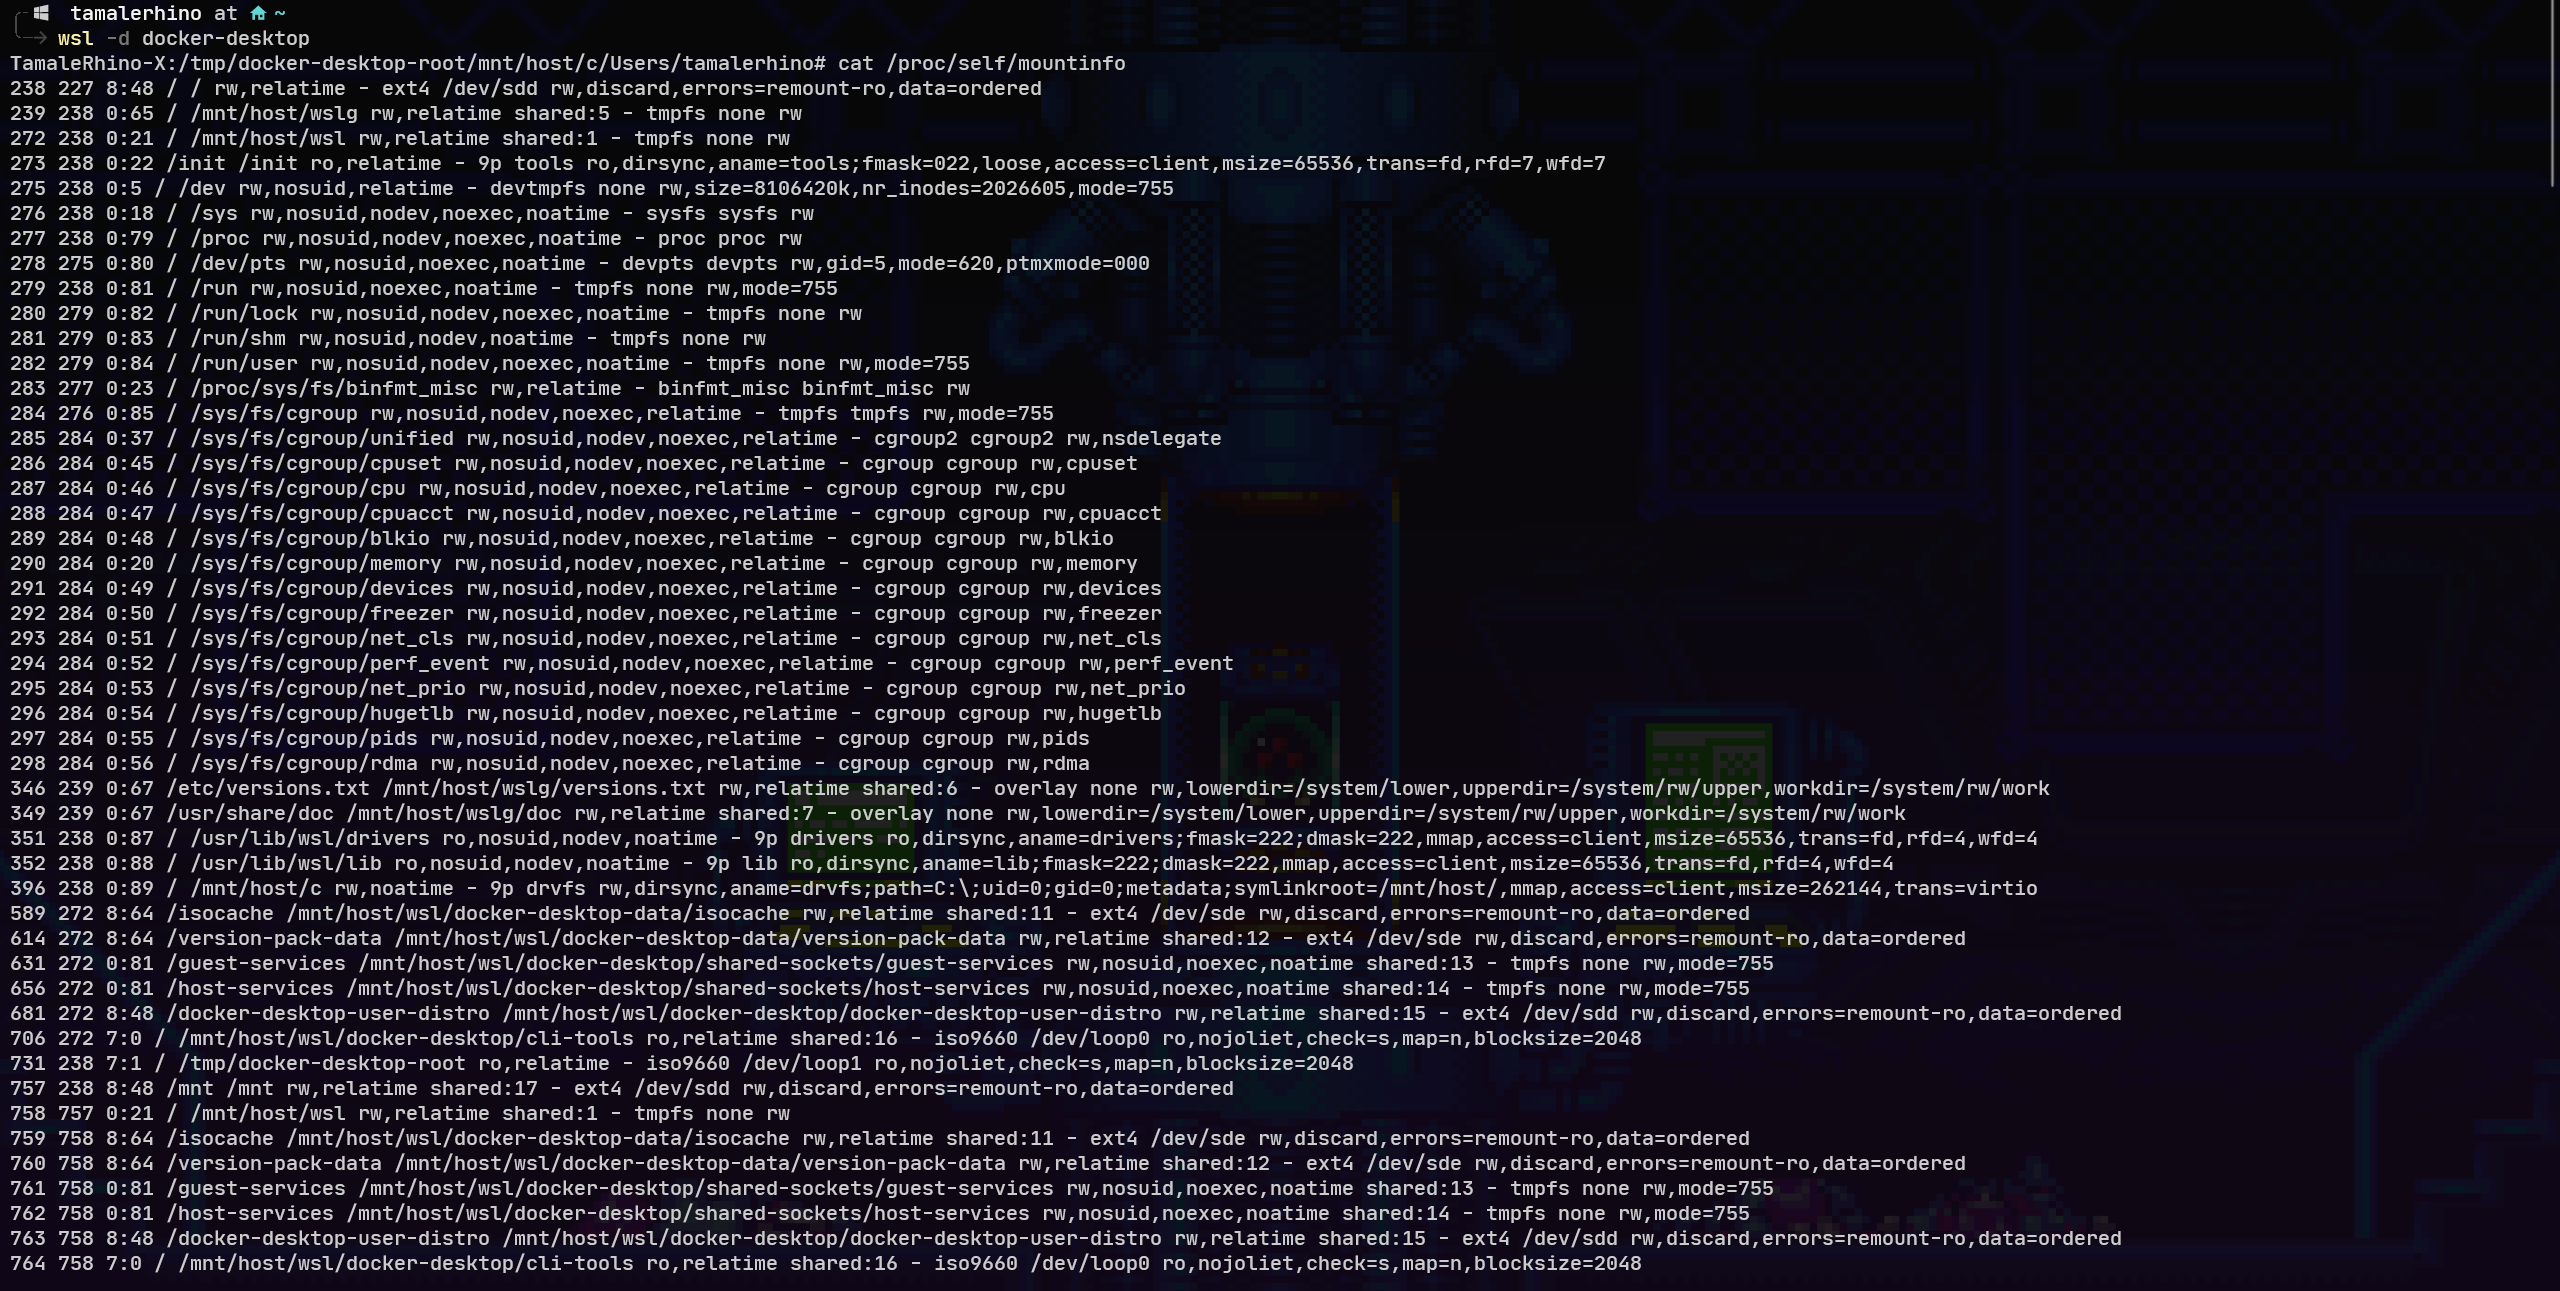
Knowing that the system is an integrated system gives us access to root level controls and directories, and the fact that most of the installation and system deployment of WSL need almost no input from the user or attacker and can be automated. Once it is installed the attacker will have full access to the subsystem without the user being alerted or notified of anything running in the background. Because the WSL2 instance is contained in the Linux System Container and runs all its calls through its own kernel none of our Windows EDR tools such as Carbon Black, will pick it up since they are only looking for specific files on the system or executables running, but the only real executable and services running are the “.exe” specific binaries and “wslhost.exe”, there is also no Event tracing for Windows output as well. This will give an attacker a fully customizable foothold within our network. Since there is no way to detect or discern an attacker running a service vs a legitimate user running a service.
Docker Specific Considerations

Docker specific consideration from a WLS2 point of view is that the distribution of docker that comes with Docker desktop by default only has the root user. And even if the user itself does not have privileges on the WSL2 side, from inside the container since the WSL drive is mounted the root user in the container can create modify, and write files directly to the windows side of the filesystem.
Here I am running a vulnerable container so I am taking the stance that either I have already have gotten root by privilege escalation or that only the root user exists on the container. As you can see from inside the container I am able to access the C drive that is mounted on the WSL part and even though I can’t access the TamaleRhino user or admin user I can still create documents under specific folders including the docker.socket which would let me make API calls directly to the Docker daemon itself.
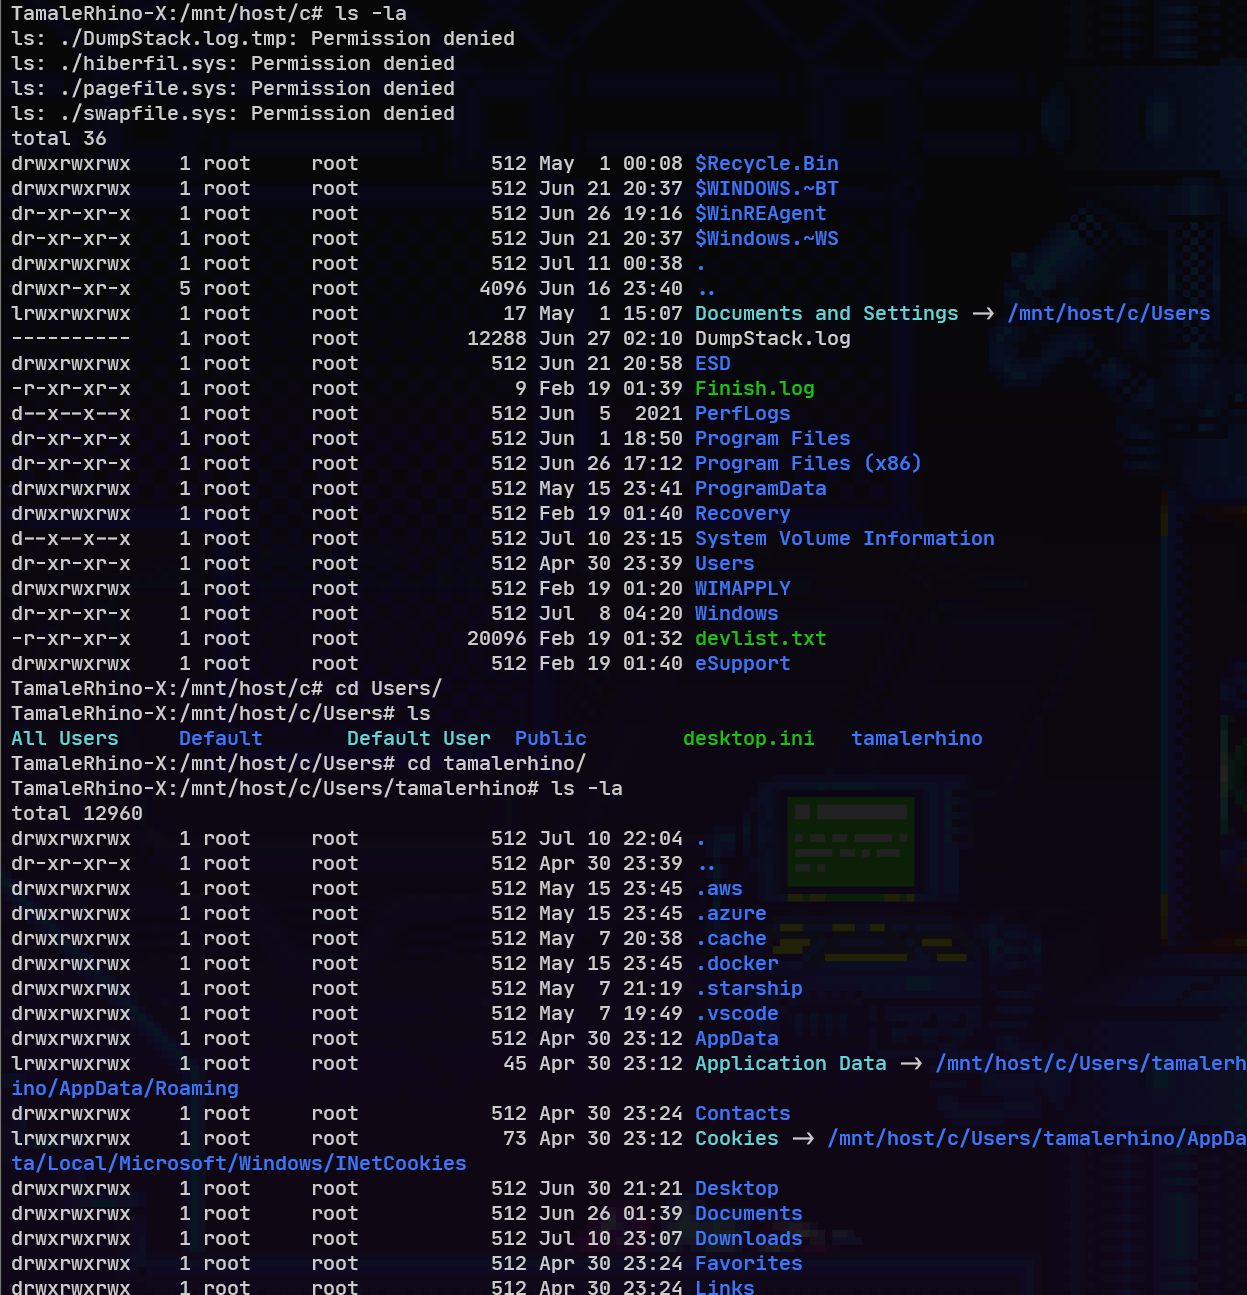
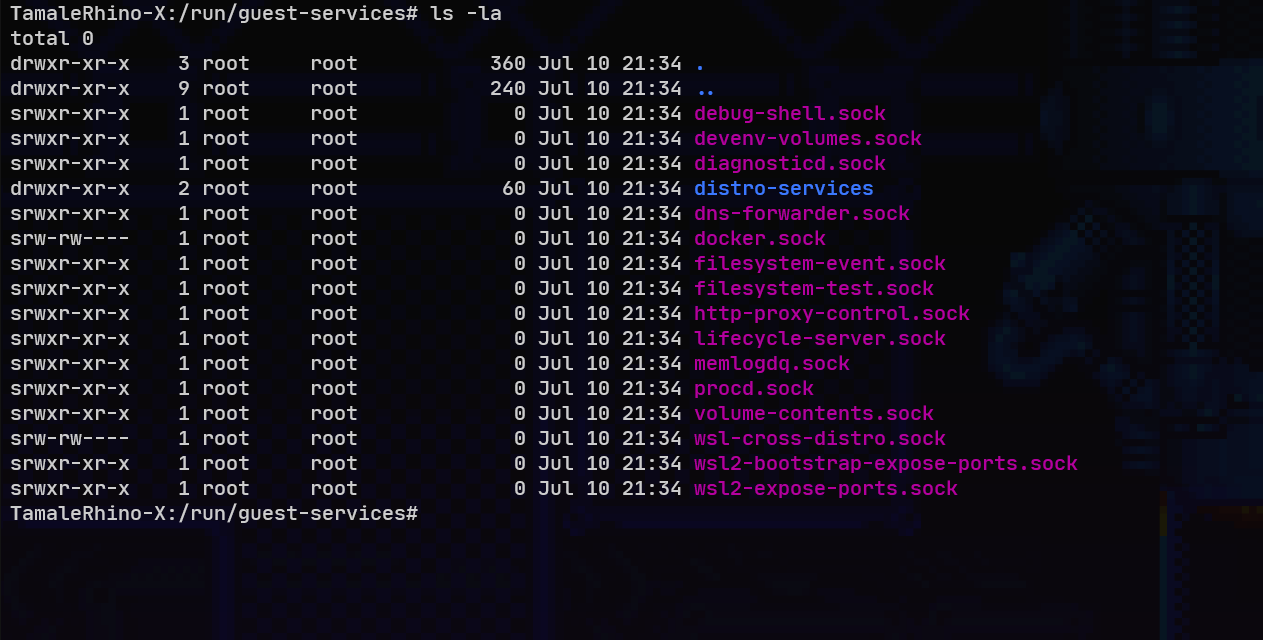
Securing Docker Desktop
When it comes to Docker best practices there are a few categories to look at, I will break them up as follows. The Host(this is really the WSL2 side of the host since it’s integrated with windows) the Docker Daemon and the Containers themselves.
Host:
Files:
From a DRT perspective WSL can be tricky to detect and, even if detected, the malicious association can be extremely difficult. As the installation of such a component is not in itself malicious, we are required to focus on the context of its deployment on a host as well as the distribution that is selected. Because a binary is created when a distribution is downloaded or installed we should be monitoring and blocking any of the standard WSL images such as “kali.exe”, “ubuntu.exe”, “centos” etc. under C:\Users\<user>\AppData\Local\Microsoft\WindowsApps\ and only allow the Docker-based distributions. Another place would be the registry itself. Anytime there is an instance deployed on the system, the configuration information for it can be found with unique identifiers under the following registry location Computer\HKEY_CURRENT_USER\SOFTWARE\Microsoft\Windows\CurrentVersion\Lxss
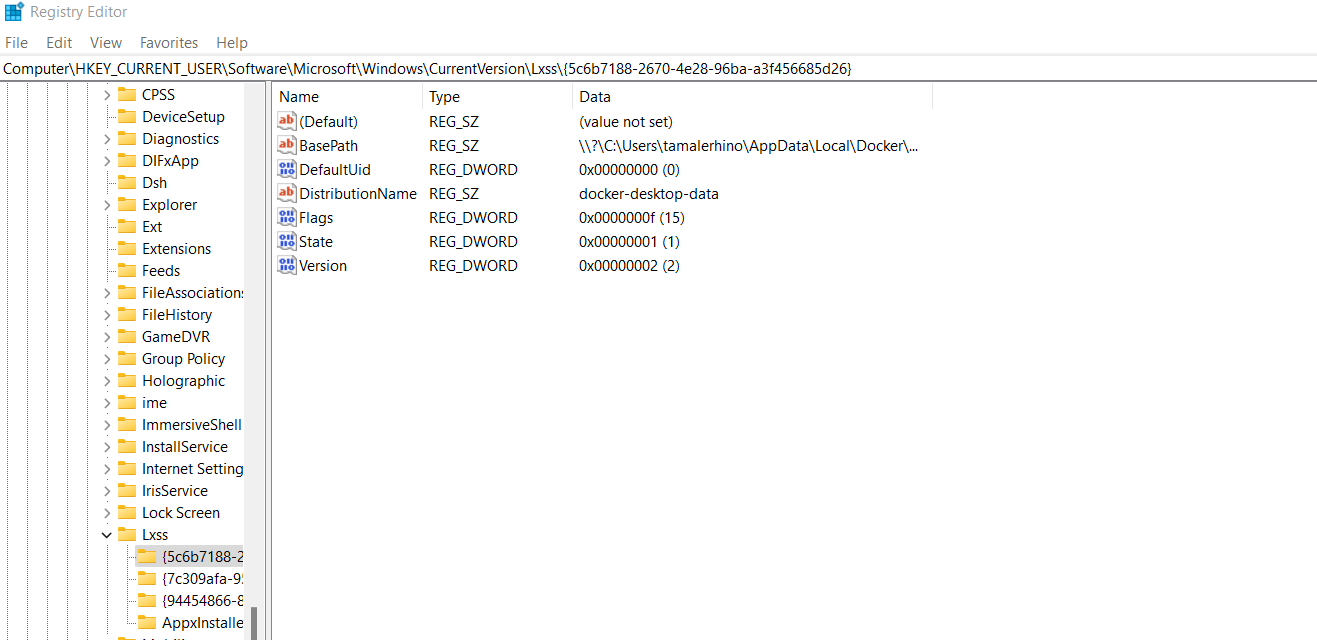
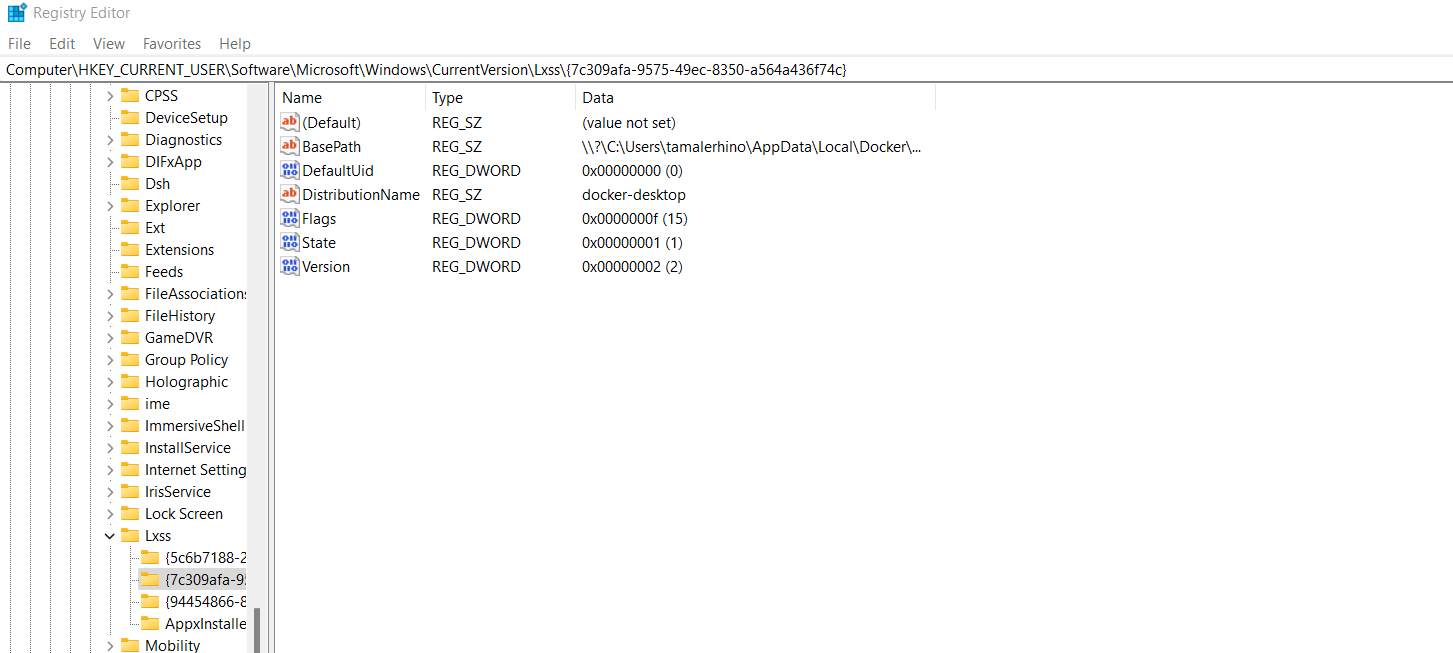
This provides an easy location to check for the distro installed as well as the location if an attacker wants to use a different location other than what is standard.
Services:
When it comes to services running it is really hard to know what is legitimate and what is not since the same services are used no matter what and from the Windows point of view it’s just a standard service.
The main service to look out for is the lxssmanager it is the main one that starts up whenever you start a WSL distro. and if this service is terminated all the associated WSL instances are also terminated. The lxssmanager service triggers two svchost.exe instances one acting as a COM surrogate and the other to execute wslhost.exe which runs for as long as the WSL instance is running. The terminal session the user initiates also creates another wslhost.exe instance as a subprocess for the terminal being used ie: Powershell, under a wsl.exe. By checking to see that wslhost.exe and lxssmanager services are running we can detect whether wsl2 is running on the system.
Because WSL2 runs on an instance with its own kernel it has no visible services on the windows side, and no logging(for WSL) like wsl1 had it makes it near impossible to monitor services inside the WSL2 instance.
However, this is where a WSL Config file would come into play, the .wslconfig file usually located in C:\Users\<yourUserName>\.wslconfig will help us set different settings for WSL2 such as resource limits, what kernel we can use, what ports can be used and any additional kernel command line arguments we want to use when the instance initializes. Other options include creating a specific /etc/wsl.conf that will let us control what filesystems or folders are automounted, Network options, what Users can be used on the system, and even if they have the ability to launch windows programs for example by creating a wsl.conf file with the interop label the key enabled set to false the user will not be able to launch windows processes. additionally setting the appendWindowsPath to false will not add Windows path elements to the $PATH environment variable.
There is also an experimental boot label that lets us run a command, we might be able to use this as some sort of hook or way to get logging out of the WSL instance into the windows machine for better monitoring.
NOTE: Again because docker desktop does not allow us to use our own distros. In order to create a /etc/wsl.conf file, we will have to do it after the fact, either through some sort of script that creates the file from the Windows side, or a script on the Docker side.
Docker Daemon
API/Syscalls:
By default, a UNIX domain socket (or IPC socket) is created at /var/run/docker.sock, requiring either root permission or docker group membership.
A daemon.json file must be created for us to manage the docker daemon. The JSON file can be located at %programdata%\docker\config\daemon.json or in the Docker Desktop GUI under Settings → Docker Engine.
Full example of the allowed configuration options on Windows
{
  "allow-nondistributable-artifacts": [],
  "authorization-plugins": [],
  "bridge": "",
  "cluster-advertise": "",
  "cluster-store": "",
  "containerd": "\\\\.\\pipe\\containerd-containerd",
  "containerd-namespace": "docker",
  "containerd-plugin-namespace": "docker-plugins",
  "data-root": "",
  "debug": true,
  "default-ulimits": {},
  "dns": [],
  "dns-opts": [],
  "dns-search": [],
  "exec-opts": [],
  "experimental": false,
  "features": {},
  "fixed-cidr": "",
  "group": "",
  "hosts": [],
  "insecure-registries": [],
  "labels": [],
  "log-driver": "",
  "log-level": "",
  "max-concurrent-downloads": 3,
  "max-concurrent-uploads": 5,
  "max-download-attempts": 5,
  "mtu": 0,
  "pidfile": "",
  "raw-logs": false,
  "registry-mirrors": [],
  "shutdown-timeout": 15,
  "storage-driver": "",
  "storage-opts": [],
  "swarm-default-advertise-addr": "",
  "tlscacert": "",
  "tlscert": "",
  "tlskey": "",
  "tlsverify": true
}
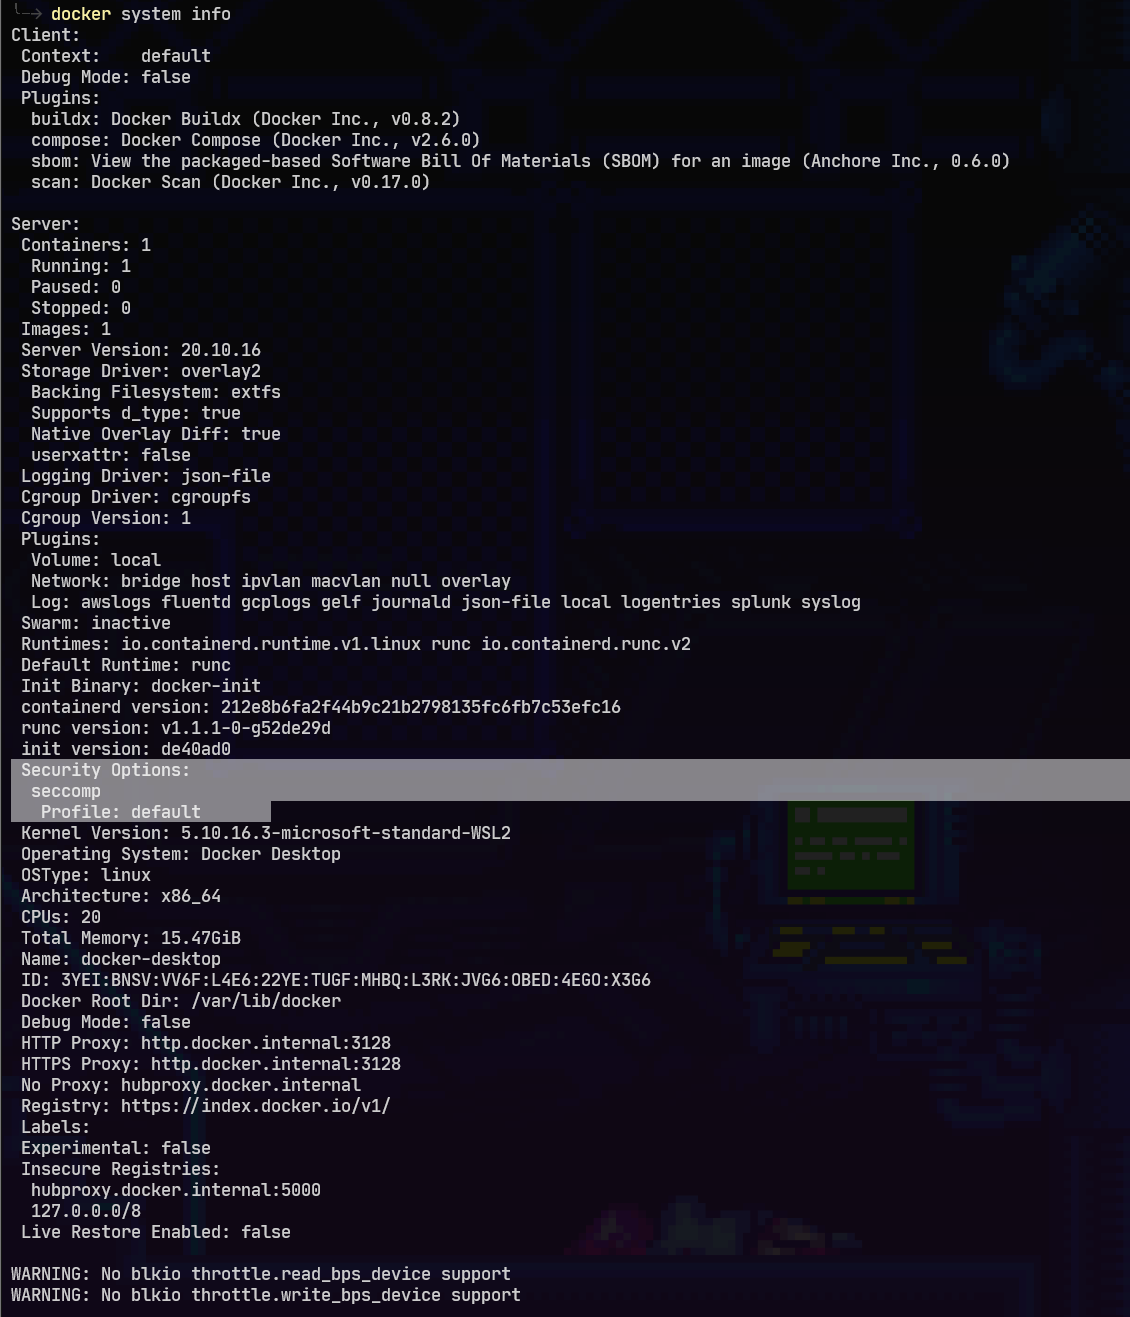
Apparmor is not available for Docker Desktop and seccomp-profile is not an option on the windows daemon.json. However, when running docker system info it does mention it is using a default profile, it seems we just can’t change it.
We can however use an Authorization Plugin. By default Docker’s out-of-the-box authorization model is all or nothing. Any user with permission to access the Docker daemon can run any Docker client command. The same is true for callers using Docker’s Engine API to contact the daemon. An authorization plugin approves or denies requests to the Docker daemon based on both the current authentication context and the command context. The authentication context contains all user details and the authentication method. The command context contains all the relevant request data.
We should use an auth plugin such as Open Policy Agent or Twistlock to get the granular controls needed.
Logging:
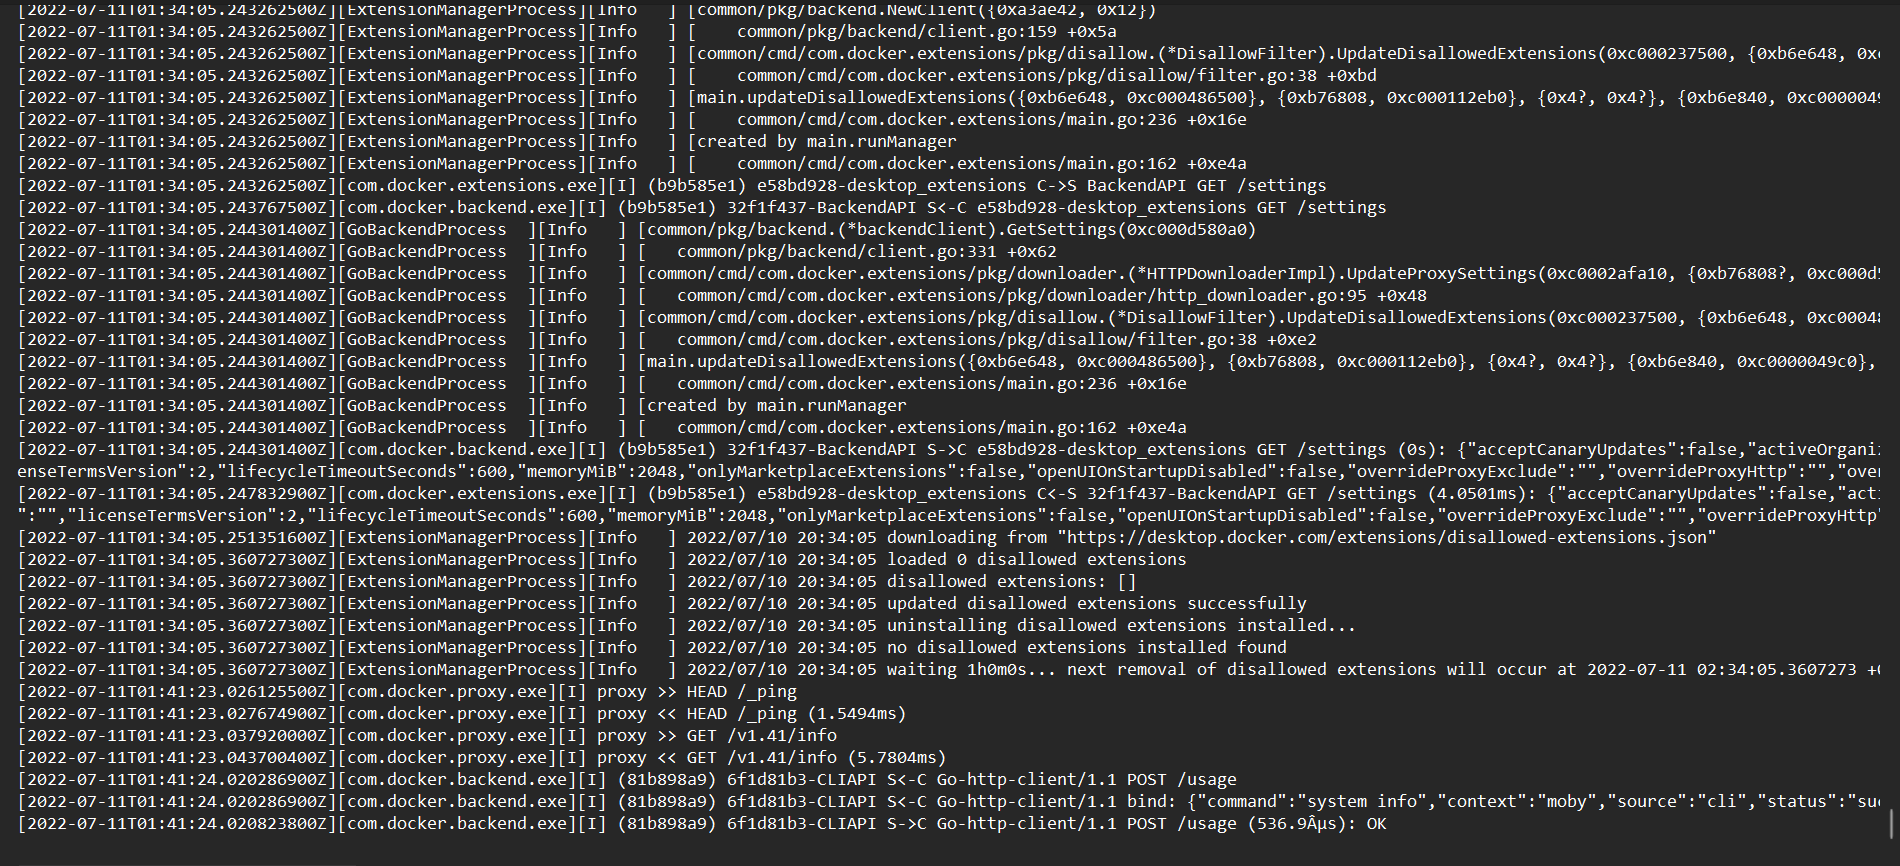
Logging for docker containers can be found under C:\Users\<user>\AppData\Local\Docker.
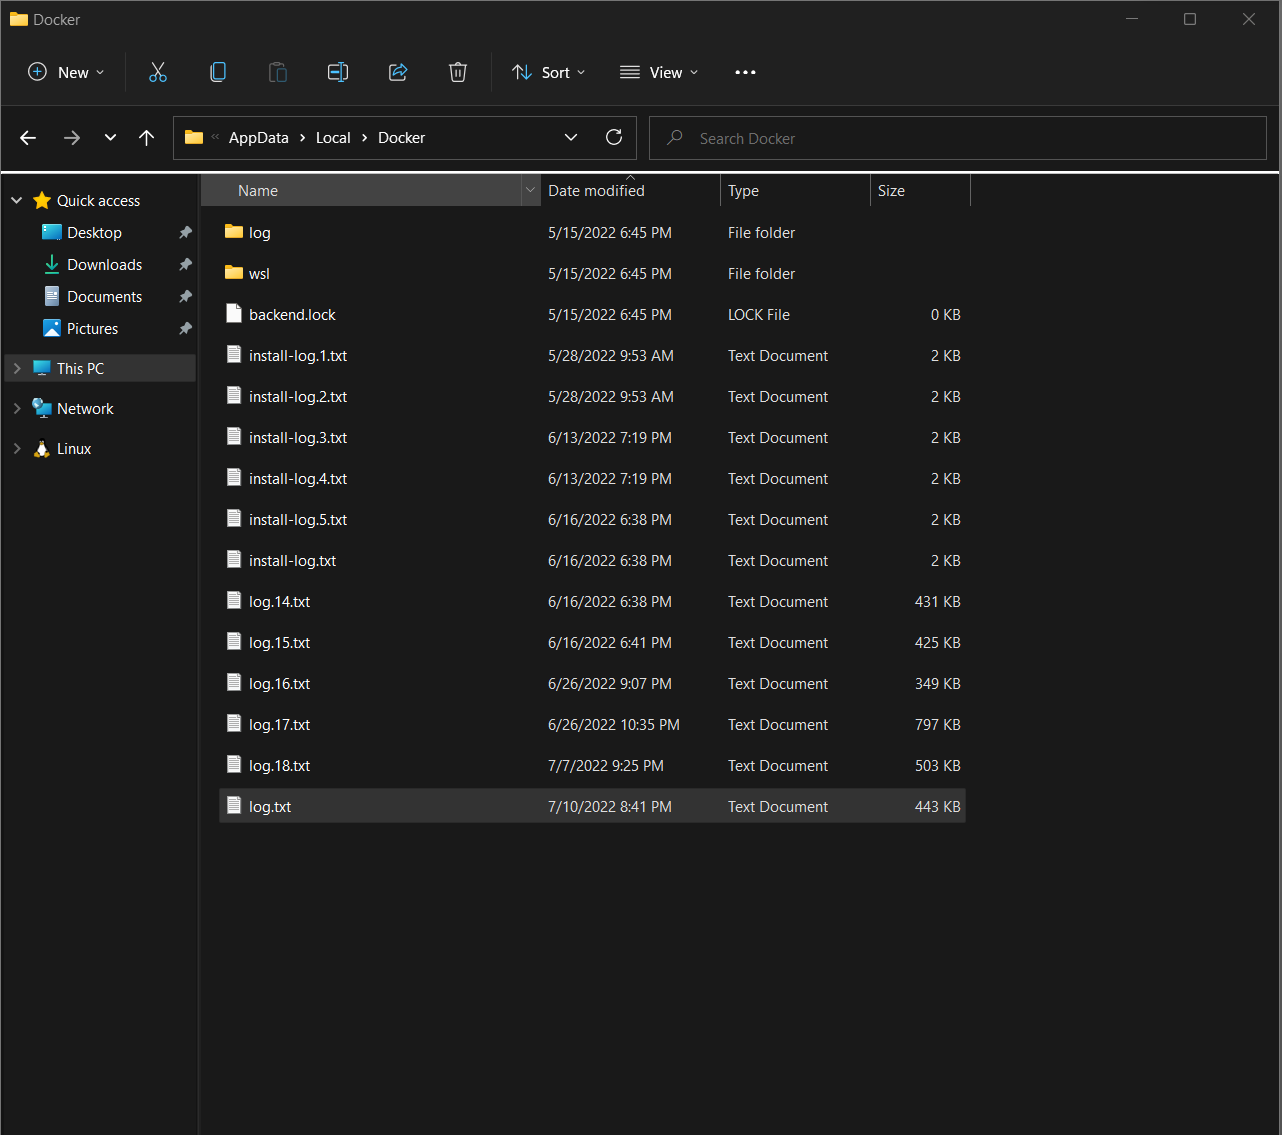
The Docker daemon logs two types of events:
- Commands sent to the daemon through Docker’s Remote API
- Events that occur as part of the daemon’s normal operation
Remote API Events
The Remote API lets you interact with the daemon using common commands. Commands passed to the Remote API are automatically logged along with any warning or error messages resulting from those commands. Each event contains:
- The current timestamp
- The log level (Info, Warning, Error, etc.)
- The request type (GET, PUT, POST, etc.)
- The Remote API version
- The endpoint (containers, images, data volumes, etc.)
- Details about the request, including the return type For example, listing the active containers on a Boot2Docker host generates the following log entry:
time="2015-11-18T11:28:50.795661833-05:00" level=info msg="GET /v1.21/containers/json"
Daemon Events
Daemon events are messages regarding the state of the Docker service itself. Each event displays:
- The current timestamp
- The log level
- Details about the event
- The events recorded by the daemon provide detailed information on:
Actions performed during the initialization process
- Features provided by the host kernel
- The status of commands sent to containers
- The overall state of the Docker service
- The state of active containers Daemon events often provide detailed information about the state of containers. However, messages regarding a container may refer to the container by ID rather than by name. For instance, a container with the name “sleepy_nobel” failed to respond to a stop command. The stop command, along with the failure notification, generated the following events:
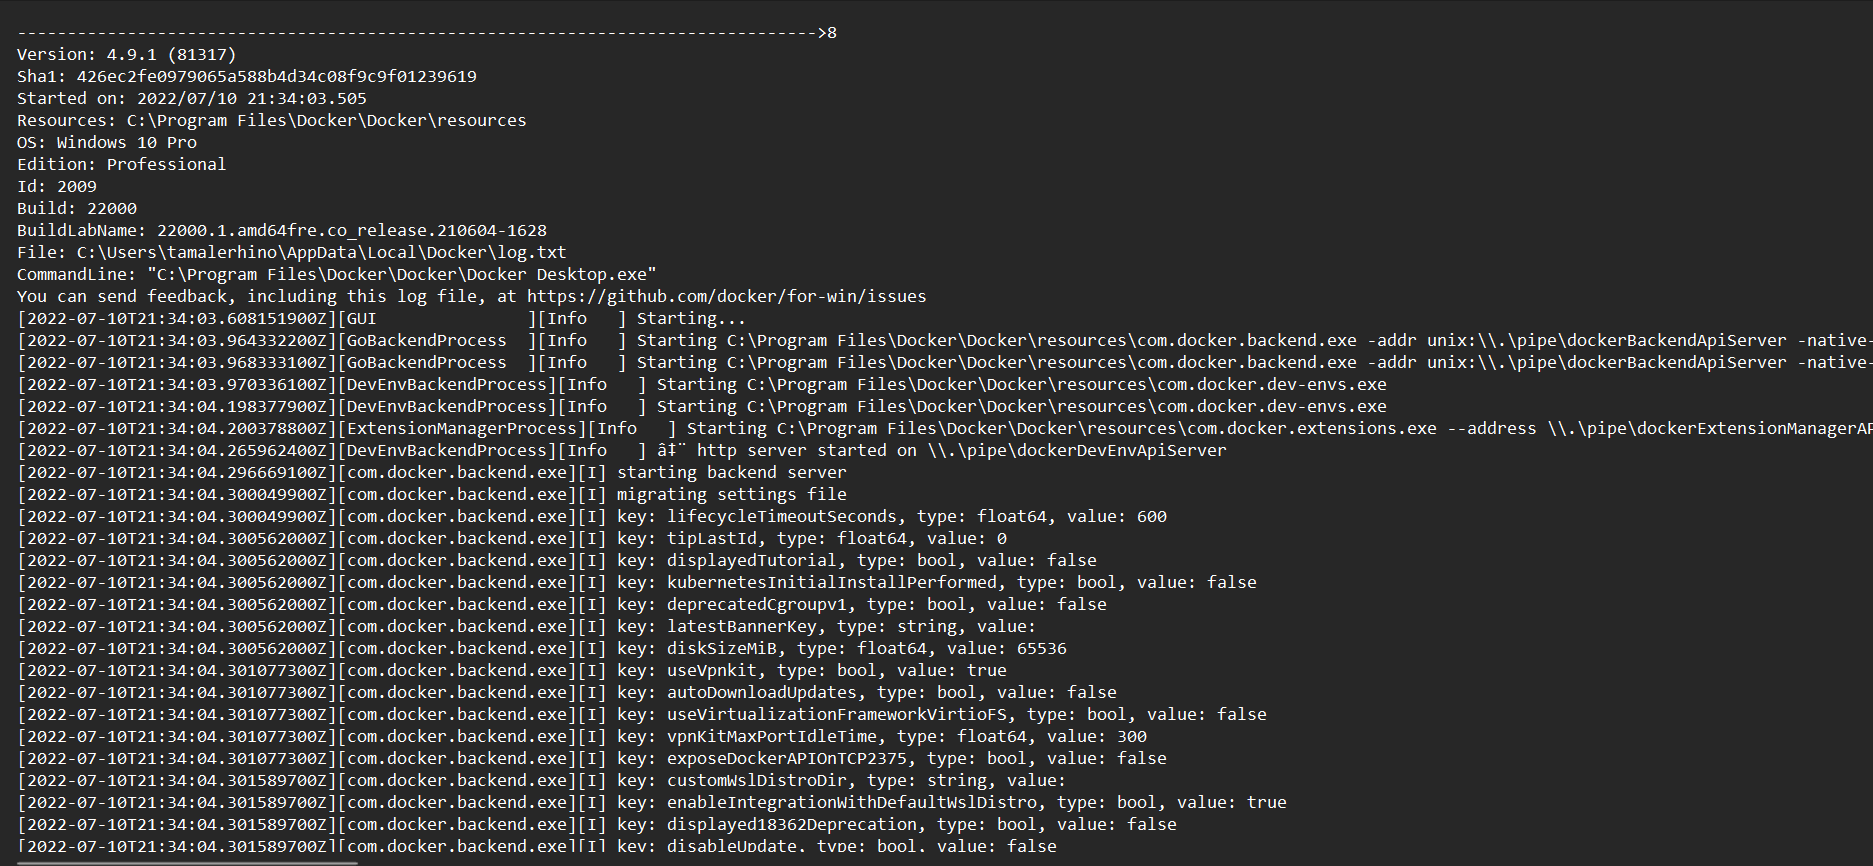
time="2015-11-18T11:28:40.726969388-05:00" level=info msg="POST /v1.21/containers/sleepy_nobel/stop?t=10"time="2015-11-18T11:28:50.754021339-05:00" level=info msg="Container b5e7de70fa9870de6c3d71bf279a4571f890e246e8903ff7d864f85c33af6c7c failed to exit within 10 seconds of SIGTERM - using the force"You can retrieve a container’s ID by using thedocker inspectcommand. Example of docker log.
Containers and Images
Although we will be limiting the Docker Desktop program to use authorized docker hubs only. There is a use case where the developer can recreate a vulnerable container and be able to share it quite easily.
The developer will have to create a dockerfile(or download from places like GitHub) that will build a vulnerable container locally. All they would have to do is download the scripts they want to run to configure the vulnerable container and create a docker file to use them.
The base image would be downloaded from our internal secure source such as our MCR, and then through the build process of their dockerfile the vulnerable docker image would be created. This is a flat file that can be zipped up and shared rather easily either through emailing directly or using our internal tools such as Bitbucket and confluence. It is because of this that we should consider the container hostile at all times and most of our controls should be focused on the host itself, wsl platform, and docker engine to give us that defense in depth needed to mitigate the risk of hostile containers.
Sources
- https://www.youtube.com/watch?v=lwhMThePdIo
- https://docs.microsoft.com/en-us/windows/wsl/compare-versions
- https://docs.microsoft.com/en-us/archive/blogs/wsl/windows-subsystem-for-linux-overview
- https://www.docker.com/blog/new-docker-desktop-wsl2-backend/
- https://levelup.gitconnected.com/docker-desktop-on-wsl2-the-problem-with-mixing-file-systems-a8b5dcd79b22
- https://www.docker.com/blog/deep-dive-into-new-docker-desktop-filesharing-implementation/
- https://docs.microsoft.com/en-us/windows/wsl/install-win10
- https://docs.docker.com/docker-for-windows/wsl/
- https://docs.microsoft.com/en-us/windows/wsl/
- https://docs.microsoft.com/en-us/windows/wsl/tutorials/wsl-containers
- https://medium.com/swlh/building-a-dev-container-for-net-core-e43a2236504f
- https://devblogs.microsoft.com/commandline/learn-about-windows-console-and-windows-subsystem-for-linux-wsl/
- https://docs.microsoft.com/en-us/windows/win32/ipc/named-pipes
- aka.ms/cliblog
- https://github.com/Microsoft/WSL
- https://docs.microsoft.com/en-us/windows/wsl/build-custom-distro
- https://github.com/linuxkit/linuxkit
- https://img.en25.com/Web/FSecure/%7B87c32f0e-962d-4454-b244-1bb8908968d4%7D_WSL-2-RESEARCH.pdf
- https://www.cvedetails.com/product/28125/Docker-Docker.html?vendor_id=13534
- https://www.loggly.com/blog/what-does-the-docker-daemon-log-contain/
- https://superuser.com/questions/1556521/virtual-machine-platform-in-win-10-2004-is-hyper-v/1619173#1619173
- https://www.docker.com/blog/capturing-logs-in-docker-desktop/

